CMS Maintenance
- 10 Jan 2024
- 3 Minutes to read
- Print
- DarkLight
- PDF
CMS Maintenance
- Updated on 10 Jan 2024
- 3 Minutes to read
- Print
- DarkLight
- PDF
Article summary
Did you find this summary helpful?
Thank you for your feedback!
About this Article
This article provides information about CMS maintenance including database backup and restore, VM and custom SSL certificate deployment.
Database Backup and Restore
NOTE
The provided scripts are applicable for the entire MongoDB instance, irrespective of any databases present in it
VM
- Log in to the Artifactory site using Virsec-provided credentials from the local machine
- Navigate to the directory cmsbase > utils > <ReleaseNumber> > shellscripts. Download and Unzip mongoBackupRestore.zip
- Execute the below commands for CMS DB backup and restore
./VM-BackupAndRestoreScript.sh -p <Backup_File_Path>   #To take the backup
./stop.sh   #stop all the CMS Services
sudo rm -rf /var/kafkavolume/ /var/zookeepervolume/ /var/lib/mongo/ /var/lib/redisvolume/ /varlib/jreports/  # Clear out existing volumes
docker-compose -f <CMS_Installation_Directory>/docker-compose-files/docker-compose-cms.yaml up -d --no-deps vsp-mongo   #To start only the Mongo Service
watch docker ps | grep mongo   # Ensure that the service is healthy
./VM-BackupAndRestoreScript.sh -b <Backup_File_Path/Filename>
  #To restore the backup
./VM-BackupAndRestoreScript.sh -h   #To view the help menu
./stop.sh   #To stop the Mongo Service
./start.sh  #To start all the CMS Services
Kubernetes
- Log in to the Artifactory site using Virsec-provided credentials from the local machine
- Navigate to the directory cmsbase > utils > <ReleaseNumber> > shellscripts. Download and Unzip mongoBackupRestore.zip
- Take the backup using the below command: Shell
./k8sbackupscript -p <Backup_File_Path> ./k8sbackupscript -h # to view help menu - Stop all the CMS services
- Execute the below command on the worker node
sudo rm -rf /home/virsec/kafkavolume - Execute the below commands for restoring backup from the Control-plane
kubectl apply -f <CMS_Installation_Directory>/cms_serviceperpod/infra/vsp_mongo.yaml #To start MongoDB Service ./k8sRestoreScript.sh -b <Backup_File_Path/Filename> #To Restore Backup ./k8sRestoreScript.sh -h #To view the help menu ./vsp_deploy_cms.sh -s #To stop MongoDB Service - Start all the CMS services
VM Backup and Restore
CMS VM backup and restore is through capturing snapshot of the VM and restoring it as required. This section provides the process of snapshot capture and restore on vCenter Web Client and vSphere Client.
vCenter Web Client
- Capture Snapshot of VM:
- Log in to the vCenter web client using valid credentials
- Right-click on the deployed VM and select Power > Power off to shut down the VM
- Right-click on the deployed VM and select Snapshot > Take Snapshot
- Give the preferred name and Description. Click OK
- Right-click on the deployed VM and select Power > Power On to start up the VM
- Restoring VM to Captured Snapshot:
- Log in to the vCenter web client using valid credentials
- Right-click on the deployed VM and select Snapshot > Revert to Latest Snapshot
- On the confirmation screen, click Yes
vSphere Client
- Capture Snapshot of VM:
- Log in to the ESXi machine using root credentials through the vSphere client
- Right-click on the deployed VM and navigate to Snapshot > Take Snapshot
- Give the preferred name and Description. Click OK
- Restoring VM to Captured Snapshot:
- Log in to the ESXi machine using root credentials through the vSphere client
- Right-click on the deployed VM and select Snapshot > Snapshot Manager
- Choose the Snapshot to which the VM should be reverted. Click Go to
- Click Yes
- Click Close
Deploy Custom SSL Certificate
VSP provides default SSL certificates utilized for communication among various components. During CMS deployment, an option is provided to utilize custom SSL certificates instead of the VSP-provided default ones. Follow the steps below:
- Identify and note the CMS Client Container ID and Dashboard Settings MFE Client Container ID(VM) using the below commands:
- VM
docker ps | grep client
docker ps | grep dashboard-settings
- Kubernetes
docker ps | grep cms-client
- VM
- Enable Shared Volume Mounts for Client Service
- Copy the custom certificates, key files and rootCA in the volume mount directory on the Master Node
- For VMs, copy on CMS VM directory: /var/lib/customer-certs
- For Kubernetes, copy on Master node directory: /home/virsec/customer-certs
- Copy the custom certificates, key files and rootCA in the volume mount directory on the Master Node
- Create the properties file vsp-cms-certs.properties in the root directory of the associated mount folder with the below content format:
ssl_certificate_file_path=<PATH_TO_SSL_CERTIFICATE_FILE_AND_NAME> ssl_certificate_key_file_path=<PATH_TO_SSL_CERTIFICATE_KEY_FILE_AND_NAME> ssl_client_certificate_file_path=<PATH_TO_SSL_CLIENT_CERTIFICATE_FILE_AND_NAME> http_proxy_rootCA=<CERTIFICATE_FILENAME> http_ldaps_rootCA=<LDAPS_CERTIFICATE_FILENAME>NOTEThe property ssl_certificate_file_path is optional. But when it is used, ensure that the two properties ssl_certificate_file_path and ssl_certificate_key_file_path are used together.
The property http_proxy_rootCA is optional. Utilize it when proxy server is applied for outbound call in the respective service. - After the property file creation, copy the files on the mount folder as mentioned in the properties file
- For Kubernetes, execute the below command to apply the custom certificates
- kubectl -n virsec create configmap cms-certs --from-file=./customer-certs/ --dry-run=client -o yaml | kubectl -n virsec apply -f - - Restart the CMS container: CMS Client and Dashboard Settings MFE Client using the below command. During restart, the CMS UI may be affected momentarily without any effect on other VSP features
docker restart <container_id> - Verification
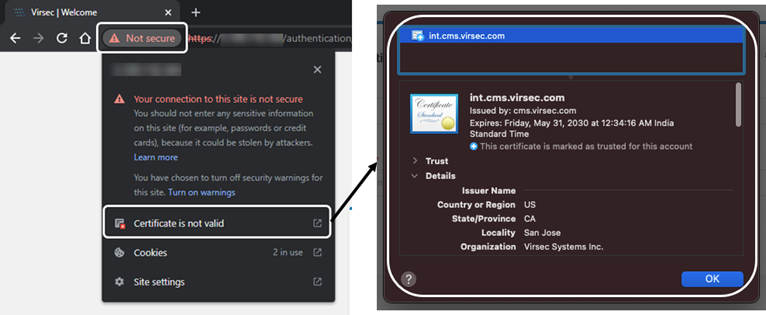
- After the container restart, log in to the CMS UI using valid credentials using a browser and verify the certificate in use
 NOTESince the changes are made to a running container, if that container instance is restarted, the above configurations must be performed again.
- After the container restart, log in to the CMS UI using valid credentials using a browser and verify the certificate in use
- (If required) For Kubernetes, execute the command below to delete the applied custom certificatesShell
kubectl delete configmap cms-certs -n virsec
kubectl -n virsec create configmap cms-certs
Was this article helpful?