Probe Installation on Container
- 23 Jan 2025
- 5 Minutes to read
- Print
- DarkLight
- PDF
Probe Installation on Container
- Updated on 23 Jan 2025
- 5 Minutes to read
- Print
- DarkLight
- PDF
Article summary
Did you find this summary helpful?
Thank you for your feedback!
About this Article
This article provides the installation steps for remote vRule engine and Probe on Container.
Remote vRule Engine Installation
Install VSP Remote vRule Engine Pod using the below commands
cd remote_vrule/  #This directory is created during CMS installation
./vsp_run_remote_vrule.sh <Unique_Deployment_Name>
The various arguments accepted by vsp_run_remote_vrule.sh script are:
Parameter | Description |
|---|---|
-h | To display the script usage |
-u | Provide this option if CMS is deployed with custom certificates |
-K | Provide this option if Kafka is configured with custom advertised listener |
-s (Optional) | To stop all the running vRule Engines |
Install Probe
Probe installation on container involves the below steps:
STEP 1: Create Application
Application creation on CMS is the first step in Probe installation. Click here for application creation steps
STEP 2: Configure Host Protection
In cases Host Protection is desired on the Probe:
Configure Threat Intelligence Service on CMS. Click here for more information
Host template must be created. Click here for more information
STEP 3: CI Phase Installation
For Web or Memory protection, the application base container is transformed into a new container with “-vsp” appended to the name. This transformation is performed by Virsec Deployment Tool (VDT).
Log in to the Kubernetes node that has access to the Application image, VSP LFR and CMS
Ensure that the application is created in CMS
Execute the below commands to transform the application container to a VSP-integrated application container:
mkdir -p vsp/<ApplicationName>
cd vsp/<ApplicationName>
wget --no-check-certificate https://<LFR_IPAddress>:8443/vsp/vsp_vdt_ci.sh && chmod +x vsp_vdt_ci.sh
./vsp_vdt_ci.sh -h  #For Help on Script Usage
./vsp_vdt_ci.sh -b <BaseImageName> -s <VSP Controller deployment type>
mkdir -p vsp/<ApplicationName>
cd vsp/<ApplicationName>
wget http://<LFR_IPAddress>/vsp/vsp_vdt_ci.sh && chmod +x vsp_vdt_ci.sh
./vsp_vdt_ci.sh -h #For Help on Script Usage
./vsp_vdt_ci.sh -b <BaseImageName> -s <VSP Controller deployment type>Parameter | Description |
|---|---|
-m | Provide “1” to modify the entry point of the container image and start the VSP services automatically. The default method used by VSP relies on an injected library to start the VSP services |
-s | Provide “1” to install VSP Controller in application container |
-u | Use this parameter if CMS is deployed with custom certificates. Refer article Install CMS for more information |
Optional Parameters-This can be used to execute custom configuration steps. This can also be utilized to set up proxy server for installation of dependencies and later to revert the changes | |
-C | Provide the configuration script file path. This script will be executed before the installation. Ensure that the file contains Dockerfile compatible instructions |
-P | Provide the configuration script file path. This script will be executed after the installation |
Once the script vsp_vdt_ci.sh is executed, a new application image with “-vsp” appended to the image name is created
Verification
The application on CMS has the below icons:
Lock symbol – To prevent further updates on CMS
Green Checkmark – To indicate CI tool execution

STEP 4: CD Phase Installation
For Kubernetes-based deployments (not individual container-based environments), follow the below steps to integrate VSP in the CD phase and set up the Application Pod:
The vsp_vdt_cd tool is downloaded to the directory (vsp/cms), created during CMS installation:
cp vsp/cms/vsp_vdt_cd <Application_yamlDirectory>
cp vsp/cms/vsp_sidecar/vsp_sidecar_frag.yaml <Application_yamlDirectory>
cd <Application_yamlDirectory>
chmod +x vsp_vdt_cd
Generate a Kubernetes configmap only for Host Monitoring functionality. For others, proceed with Step 3. The configmap contains the VSP Host files mounted on to the Application container at runtime
Copy the below files from the directory (vsp/cms) that is created during CMS installation to the current directory:
ld.so.preload
entrypoint_virsec_host.sh
<application_container_os_type>/libvsp-hmm-agent.so
Execute the below command to generate kubernetes configmap named vsp-hmm(an arbitrary name)
kubectl create configmap vsp-hmm --from-file ld.so.preload --from-file entrypoint_virsec_host.sh --from-file libvsp-hmm-agent.soNOTE
Separate config maps must be created for each Operating System type
Modify the application yaml file to integrate the required VSP configurations into it:
For help on the tool usage:
./vsp_vdt_cd -hExecute the below command:
./vsp_vdt_cd [--alpine] <Application_yaml_filename> <VSP Sidecar YAML fragment filename> <Customer_BaseContainerName> <vRule Engine Configuration> <vsp-host-configmap>Parameter
Description
<VSP Sidecar YAML fragment filename>
This parameter is not required if VSP Controller is deployed as an In-Application Container configuration. Provide a single '-' (dash) in such cases
<vRule Engine Configuration>
Provide “0” for Embedded vRule Engine and “1” for Remote vRule Engine
<vsp-host-configmap>
If the application has gone through the VSP_VDT_CI tool, then, provide a single '-' (dash)
Optional Parameters
--alpine
This parameter is used if VSP Host is enabled on an alpine-based application container only
--host-only
This parameter is used only when VSP Host protection is enabled and the VSP CI tool has not been executed on the application container (Refer CI Phase Installation for more information on CI tool)
--host-ignore-tag
Ignore the application image tag for VSP Host Monitoring
-c CMS_IP, --cms-ip CMS_IP
The VSP CMS IP Address
-C CMS_URL, --cms-url CMS_URL
The VSP CMS Load Balancer URL (Required for VSP-Host only configuration)
-k KAFKA_IP, --kafka-ip KAFKA_IP
The VSP Kafka Server IP Address
-K KAFKA_HOSTNAME, --kafka-hostname KAFKA_HOSTNAME
The VSP Kafka Server Load Balancer URL (Required for VSP-Host only configuration)
-p KAFKA_PORT, --kafka-port KAFKA_PORT
The VSP Kafka Server port used to connect VSP pods to CMS (Required for VSP-Host only configuration)
-L LFR_URL, --lfr-url LFR_URL
The VSP LFR Load Balancer URL (Required for VSP-Host only configuration)
-P LFR_PORT, --lfr-port LFR_PORT
The VSP LFR Port
vsp_vdt_cd tool produces a modified version of the application yaml file with the required configurations for VSP Controller and other required environment variables. The file name is <Application_yaml_filename>-vsp.yaml
Application Deployment with VSP Components
If the application is run in a non-default namespace, execute the below command to ensure the VSP sidecar can be pulled:
kubectl get secret regcred --namespace=virsec -o yaml | sed 's/namespace: virsec/namespace: /g' | kubectl create -f -For Kubernetes-based deployments, deploy VSP-protected Application Pod using the below command
kubectl apply -f <Modified Application yaml file>
STEP 5: Verification
On Management Node
Execute the below commands to verify that the deployed pods are running:
kubectl get deployments <deployment_name>
kubectl describe deployment <deployment_name>
Execute the below commands to verify that the deployed containers are running:
kubectl get pods <pod_name>
kubectl describe pod <pod_name>
Refer to the Trouble Shooting article on how to attach to a running container and view more information
On CMS
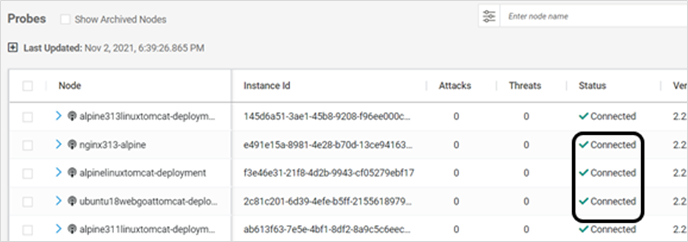
Log in to CMS and navigate to Deploy > Probes in the left navigation pane to verify that the container is in Connected state
Navigate to Manage > Web > Application Provisioning to confirm that the application is locked and the instance shows 100% completion in Progress tab

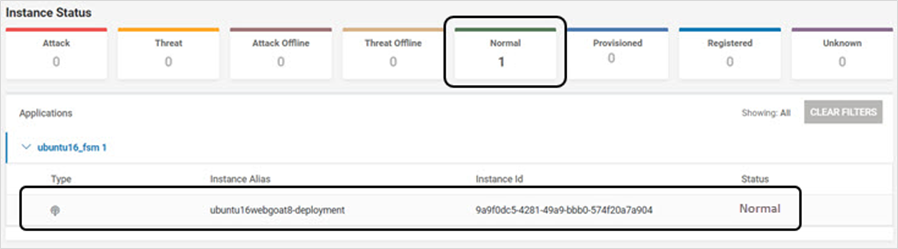
Navigate to Monitor > Overview to verify that the application is in Normal state
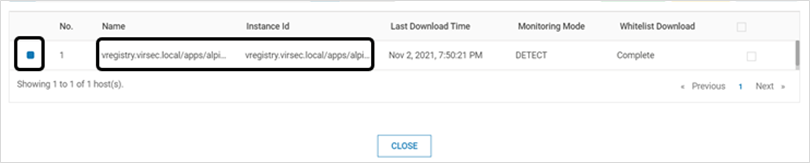
Navigate to Manage > Host > Host Protection to verify VSP Host is running on CMS
Select the below icon on the listed profile that matches the name of the application deployment
.png)
Verify that the newly-launched VSP-protected application container is listed and has a blue symbol denoting that the Probe is healthy and running
Was this article helpful?