Kubernetes-based Setup on AWS
- 08 Sep 2023
- 1 Minute to read
- Print
- DarkLight
- PDF
Kubernetes-based Setup on AWS
- Updated on 08 Sep 2023
- 1 Minute to read
- Print
- DarkLight
- PDF
Article summary
Did you find this summary helpful?
Thank you for your feedback!
About this Article
This article provides environment setup steps for deploying VSP on Kubernetes engine on AWS EC2.
Pre-requisites
The pre-requisites for VSP installation:
- EC2 machine with:
- kubectl
- helm
- awscli
- docker
The pre-requisites for Kubernetes engine deployment on AWS EC2
- AWS IAM User account with the role
- AmazonEC2FullAccess
AWS EC2 for Kubernetes Architecture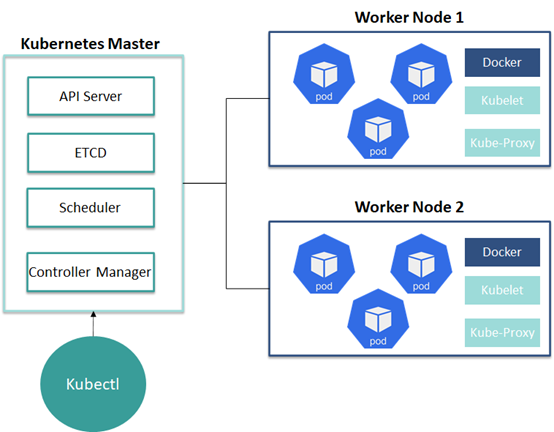
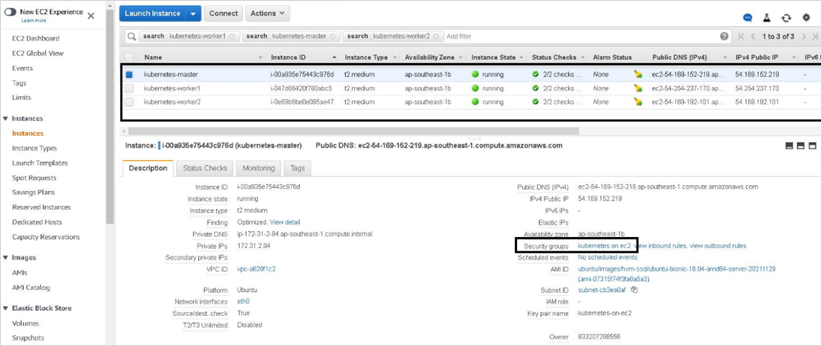
EC2 Machine Creation
- Access the AWS Dashboard: https://console.aws.amazon.com/ec2 using valid credentials
- Navigate to EC2 > Instances > Launch an instance. Provide an appropriate Name
- Under the Quick Start tab, select Ubuntu
- Select Instance type as required for CMS. Example: t2.medium
- Select the Number of instances as 3
- Click Create new key pair if required for authentication credentials
- Configure the Storage information as required and click Launch Instance
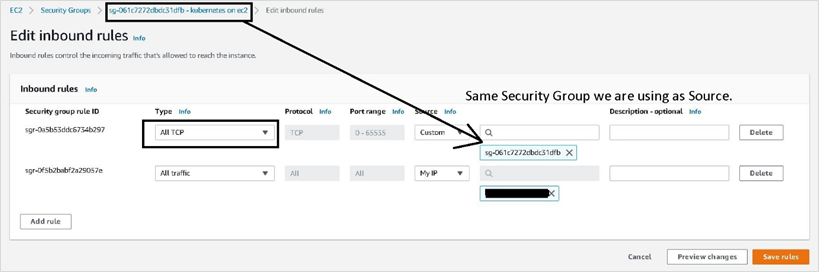
- Modify the Security Group for existing machines as below
- Click on the Security Group ID and modify the Inbound rule by clicking Edit Inbound rules
- Modify the Security Group details as below
 NOTEPublic IP may change every time. If it is not possible to log in to the machines, change the Source to MYIP and try to log in
- Log in to all the three EC2 machines and install the required software to provision Kubernetes Clusters
- Modify the hostname for all the three machines:
hostnamectl set-hostname <hostname>
- Modify the hostname for all the three machines:
Installation
- Execute the commands below to install the required kubernetes software in all the three machines
sudo su sudo apt-get update sudo apt-get install -y apt-transport-https ca-certificates curl sudo curl -fsSLo /usr/share/keyrings/kubernetes-archive-keyring.gpg https://packages.cloud.google.com/apt/doc/apt-key.gpg echo "deb [signed-by=/usr/share/keyrings/kubernetes-archive-keyring.gpg] https://apt.kubernetes.io/ kubernetes-xenial main" | sudo tee /etc/apt/sources.list.d/kubernetes.list sudo apt-get install -y kubelet=<Kubernetes_Version> kubeadm=<Kubernetes_Version> kubectl=<Kubernetes_Version> #Example: sudo apt-get install -y kubelet=1.19.0-00 kubeadm=1.19.0-00 kubectl=1.19.0-00 apt update apt install docker.io -y - Execute the commands below to provision Kubernetes Control plane on the master machine
sudo kubeadm init --pod-network-cidr=<CIDR_Range_for_IPAddress> #Example: sudo kubeadm init --pod-network-cidr=10.244.0.0/16 mkdir -p $HOME/.kube sudo cp -i /etc/kubernetes/admin.conf $HOME/.kube/config sudo chown $(id -u):$(id -g) $HOME/.kube/config kubectl apply -f https://github.com/coreos/flannel/raw/master/Documentation/kube-flannel.yml kubectl get nodes #To list nodes - Execute the command below to generate a join command to execute on the worker nodes
kubeadm token create –print-join-command - On the Worker machines, execute the join command so that the machines join as workers in the Kubernetes cluster
- Example: kubeadm join 172.31.2.84:6443 --token fh9lqg.4ko0gz16owx1r8i6 --discovery-token-ca-cert-hash sha256:02fba06cea1124f3639e6aebbcf4f01464bd9dc22512fe50e208be8ed4d56582
- On the master machine, execute the command below to list the nodes
kubectl get nodes - The Kubernetes cluster is up and running for workload deployment
Was this article helpful?