Kubernetes-based Setup on EKS
- 11 Sep 2023
- 2 Minutes to read
- Print
- DarkLight
- PDF
Kubernetes-based Setup on EKS
- Updated on 11 Sep 2023
- 2 Minutes to read
- Print
- DarkLight
- PDF
Article summary
Did you find this summary helpful?
Thank you for your feedback!
About this Article
This article provides steps environment setup steps for deploying VSP on Kubernetes engine on AWS EKS.
Pre-requisites
The pre-requisites for VSP installation:
- EC2 machine with:
- kubectl
- helm
- awscli
- docker
The pre-requisites for Kubernetes engine deployment on AWS EKS
- AWS IAM User account with the role
- AmazonEC2FullAccess
- AmazonEKSFullAccess
EKS Setup Architecture
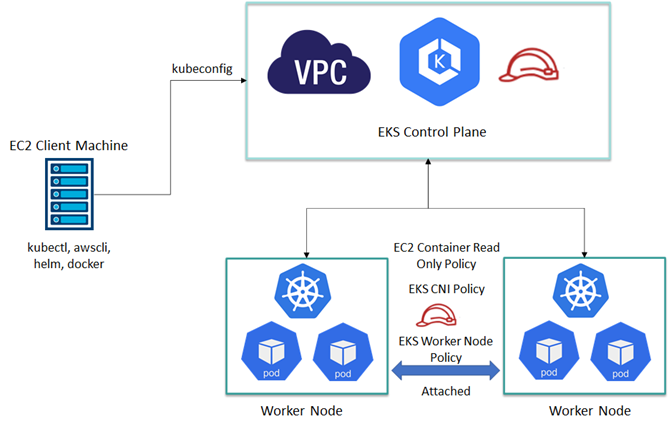
EC2 Machine Creation
- Access the AWS Dashboard: https://console.aws.amazon.com/ec2 using valid credentials
- Navigate to EC2 > Instances > Launch an instance. Provide an appropriate Name
- Under the Quick Start tab, select Ubuntu
- Select Instance type as required for CMS. Example: t2.medium
- Select the Number of instances as 1
- Click Create new key pair if required for authentication credentials
- Configure the Storage information as required and click Launch Instance
Installation
- Log in to the client machine created, using valid credentials
- Execute the commands below to install kubectl, awscli and helm
- kubectl Installation
apt update sudo apt-get update && sudo apt-get install -y apt-transport-https gnupg2 curl curl -s https://packages.cloud.google.com/apt/doc/apt-key.gpg | sudo apt-key add –- echo "deb https://apt.kubernetes.io/ kubernetes-xenial main" | sudo tee -a /etc/apt/sources.list.d/kubernetes.list sudo apt-get update sudo apt-get install -y kubectl - awscli Installation
apt update sudo apt-get install awscli -y - docker Installation
apt update
apt install docker.io -y
docker -v
- kubectl Installation
- To procure Access Key and Secret Access Key
- On the AWS console, navigate to My Security Credentials
- Click Create access key
- Log in to the client machine and configure aws access key and secret access key using the command below. Provide aws access key, secret access key and region when prompted
aws configure
- To create EKS cluster on AWS Console. Create an IAM role for EKS control plane
- Navigate to IAM > Create role. Select the required service
- Navigate to AWS Service > EKS
- Navigate to EKS Cluster > Permissions
- Select AmazonEKSClusterPolicy and click Tags
- On the Review page, provide a role name. Click Create role
- Create a new role for worker node group
- Navigate to IAM > Create role. Select the required service
- Navigate to the required AWS Service > EC2. Click Permissions
- Attach the policies - AmazonEKSWorkerNodePolicy, AmazonEKS_CNI_Policy and AmazonEC2ContainerRegistryReadOnly.
- Click on Tag. On the Review page, provide a Role name. Click Create role
- Click Cluster > Create Cluster
- Provide the Name, Kubernetes Version and Cluster Service role. Click Next
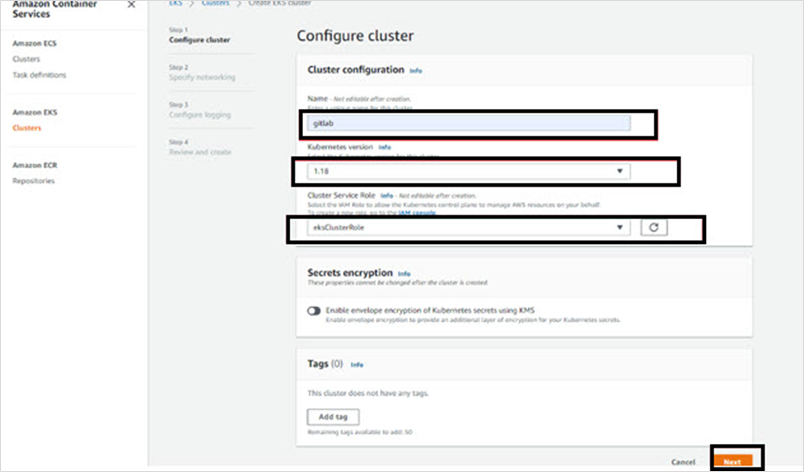
- Select VPC, Subnets, NSG and Public Access. Execute the remaining steps to create the Cluster, with the default values
- Once the EKS cluster becomes Active, click on cluster name
- Click on Configuration tab. Click Compute > Add node group
- Provide Name and IAM Role. Click Next
- Select the required instance type. Click Create
- Select the required Subnets and SSH keypairs. Create the Node group
- Once the Node Group is created, log in to the client machine
- Fetch the kubeconfigfile from the Control plane using the commands below:
aws eks --region us-east-1 update-kubeconfig --name gitlab kubectl get nodes # Should list 2 Machine in Ready State - Install Helm 2 or Helm 3
- Helm 2 Installation:
wget https://get.helm.sh/helm-v2.16.12-linux-amd64.tar.gz tar -zxvf helm-v2.16.12-linux-amd64.tar.gz cd linux-amd64/ mv helm /usr/local/bin helm init --stable-repo-url https://charts.helm.sh/stable helm init # To create Tiller Pod helm version #To Create Service Account and assign permission to the Tiller pod, so that it deploys workload on Kubernetes kubectl create sa tiller –namespace kube-system kubectl create clusterrolebinding tiller-cluster-rule --clusterrole=cluster-admin --serviceaccount=kube-system:tiller kubectl patch deploy --namespace kube-system tiller-deploy -p '{"spec":{"template":{"spec":{"serviceAccount":"tiller"}}}}' kubectl get all --all-namespaces | grep tiller #Verification - Helm 3 Installation: Tiller Pod is not required for Helm 3
wget https://get.helm.sh/helm-v3.5.2-linux-amd64.tar.gz
tar -zxvf  helm-v3.5.2-linux-amd64.tar.gz
cd linux-amd64/
mv helm /usr/local/bin
helm version
- Helm 2 Installation:
Delete Node Group or Fargate Profile
- Navigate to EKS > Clusters. Click gitlab
- Navigate to Configuration > Compute. Delete the node group or fargate profile to delete the cluster. Unless node group and fargate are deleted EKS cluster cannot be deleted
Was this article helpful?