AD
AD stands for Active Directory. It is a directory services implementation that provides functionalities like authentication, group and user management, policy administration and more. AD supports both Kerberos and LDAP. Microsoft AD is by far the most common directory services system in use today. AD provides Single-Sign On (SSO) and works well on premise and over VPN.
An admin can create a group of users and give them specific access privileges to certain directories on the server. As a network grows, AD provides a way to organize a large number of users into logical groups and sub-groups, while providing access control at each level. A port is utilized for communication between AD and CMS
LDAP
LDAP stands for Lightweight Directory Access Protocol. LDAP provides a communication language that applications use to communicate with directory services servers.
LDAP is used for user authentication across existing Active Directory. There are multiple ways of configuring the directory. The way the authentication is carried out is based on the way the directory is organized. Multi-tree structure is also supported by VSP.
LDAP Working Process
- A client sends a request for information stored within an LDAP database along with the user’s credentials to an LDAP server
- The LDAP server then authenticates the credentials submitted by the user against their core user identity, which is stored in the LDAP database
- If the credentials submitted by the user match the credentials associated with their core user identity that is stored within the LDAP database, the client is granted access and receives the requested information (attributes, group memberships, or other data)
- If the credentials do not match, the client is denied access to the LDAP database
How to Integrate LDAP with CMS
An existing LDAP instance can be configured with CMS. The below diagram provides an overview of CMSworkflow with LDAP, when an LDAP user tries to log in to CMS: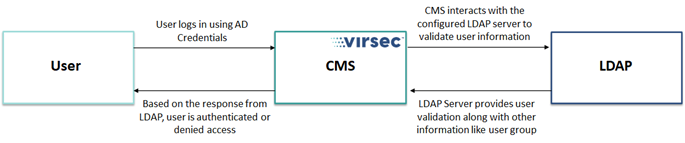
- Once the user is authenticated from LDAP, the user can be viewed in CMS in the User page.
- Specific role can be assigned to the LDAP User in CMs. The user will be able to access CMS based on the assigned role only
- User Group information procured from LDAP is utilized to associate the user with relevant user role in CMS
- If the user group information is not procured from LDAP, the default CMS user role is assigned to the user. Refer User Roles for more information about the various default user roles
LDAP Configuration on CMS
- When LDAPS is configured or imported and the error “SSL/TLS certificate is invalid or not available in truststore” is encountered, ensure that the Custom SSL certificates is configured.
- It is highly recommended to use email as the unique login attribute in the LDAP configuration. If CN is configured and the email ID is modified, CMS does not load the dashboard for that user
The below steps are to configure existing LDAP instance on CMS
- Navigate to Administration > Access Management in the left navigation pane. Select the tab LDAP
- The configuration has five sections:
- General Settings
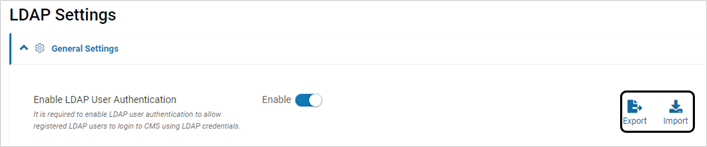
- Expand LDAP General Settings section and click Enable to allow registered LDAP users to login to CMS using LDAP credentials
- The LDAP settings can be exported to the local machine. It can be imported to CMS in another environment
- LDAP Connection
- Expand LDAP Connection section and click Edit to provide the information
- The table below provides the various LDAP Connection Parameters
Field Name Description Host The DNS hostname or IP address of the LDAP or AD server Port Port number for LDAP or AD server access Protocol Select the appropriate Protocol from the drop-down: LDAP or LDAPS Validate Server Certificate If enabled, the server certificate is validated Authentication Realm User defined value that defines the authentication directory and associated policies to search for users and groups Timeout (seconds) The number of seconds the system waits for a response from the LDAP server before it closes the connection and tries to connect again Dead Time (minutes) The time (in minutes) that the system considers an unresponsive authentication server to be “dead” or “out of service”. During this time, the system falls back to using local authentication. After every Dead Time expiry, the system attempts to determine if the server is active again Retry Count The number of times that the system attempts to connect to the LDAP server. If the number of timed-out attempts reaches the configured Retry count, it is considered inactive (dead) and the Dead Time timer starts. Further traffic is not sent to the server till it becomes responsive again - Click TEST CONNECTION after fill in all the details to test the LDAP. Once the test is successful, click SAVE
- LDAP Connection Authentication
- Expand LDAP Connection Authentication section and click Edit to provide the information
- The table below provides the various LDAP Connection Authentication Parameters
Field Description Authentication Method Select the appropriate method from the drop-down – Anonymous, Simple or Strong. LDAP supports Simple method ONLY Bind DN (Username) Distinguished Name (DN) of a user in the directory that has read access to all information about valid users. Example: uid=admin,ou=system Bind Password Password for the provided Bind DN - Refer Procure Connection Authentication Parameters for Bind DN (Username) and Password Procurement
- Click TEST CONNECTION AUTHENTICATION after fill in all the details to test the LDAP configuration. Once the test is successful, click SAVE
- LDAP User BindingNOTE
- Ensure that the configured user belongs to an existing group
- Emails configured with spaces in LDAP are not supported. In such cases, a “valid object class error” is encountered on CMS LDAP configuration page for the section LDAP User Binding
- Expand LDAP User Binding section and click Edit to provide the information
- The table below provides the various LDAP User Binding Parameters
Field Description Base DN The base of the search tree for all users. Example: ou=users,dc=adobe,dc=com User Object Class Filter for directories where the Base DN is a mix of object types (Example: people, groups, printers, etc) and the search scope has to be limited to “people” Login Attribute Attribute of the LDAP directory users that will be used to log in. Example: user ID or full email address or both. Value must be “cn” Real Name Attributes Attributes of the Object class that supplies the real name of the user to be mapped to the real name of the user in CMS Email Attributes Attributes of the Object class that supplies the email address of the user Advanced Search within Nested Group Enable or disable searching within nested groups. This option is disabled by default Follow Referrals In multi-tenant or multi-domain enterprise forests, AD/LDAP queries may be referred to another server. A referral is when an LDAP server forwards an LDAP client request to another LDAP server. This option is disabled by default Limit Referrals The number of referrals that should be followed when AD replies with a Referral response. Select the appropriate value from the drop-down. The default selected value is "5" - Refer Procure User Binding Parameters for more information on procurement of Base DN, Login Attribute, User Object and Email Attribute
- Click TEST USER INFORMATION after fill in all the details to test the LDAP configuration
- Provide the username created earlier for Login ID and Bind Password value as password
- Once the test is successful, click Close. Click SAVE
LDAP User Group Binding - Expand LDAP User Group Binding section and click Edit to provide the information
- The table below provides the various LDAP User Group Binding Parameters
Field Description Set Roles From Groups Option to enable mapping LDAP groups to RBAC roles Search Group Subtrees Configures whether subtrees of the Base DN must be included during group search in the directory Group Type Static - Tacked by an attribute on object
Dynamic - Members will be tracked by groupBase DN The base of the search tree for all users. Example: ou=users,dc=adobe,dc=com Group Object Classes Filter for directories where the Base DN is a mix of object types (i.e., people, groups, printers, etc), and the search scope has to be limited to “people” Group Member Attribute Attribute of the Object class that supplies the real member of the user group, for mapping to the user account. Example: cn Group User Attribute Attributes of an LDAP object used for identifying the user of a group. Example: cn Group to Role Binding Default Role The default role if no role is mapped for a user Group DN, Roles Select Group DN and the corresponding CMS Roles. Multiple entries can be added User ID LDAP User ID to test the configuration - Click TEST GROUP MEMBERSHIP after fill in all the details to test the configuration. Once the test is successful, click SAVE
- General Settings
Export/Import LDAP Configuration
- LDAP configuration can be imported or exported with .virsec extension
- This feature can be used when VSP protection is extended to a different environment (Example: Pre-production to Production environment)
- Ensure that import/export operations are carried out in the same VSP version. Import/export feature is compatible across various patches in the same major release (Example: VSP 2.8.x)
Procure LDAP Connection Authentication Parameters
Bind DN (User Name)
- Navigate to Active Directory Users
- If a user does not exist, create a new user
- Right click on the listed Domain Admins entry. Select the Members tab and add the required user
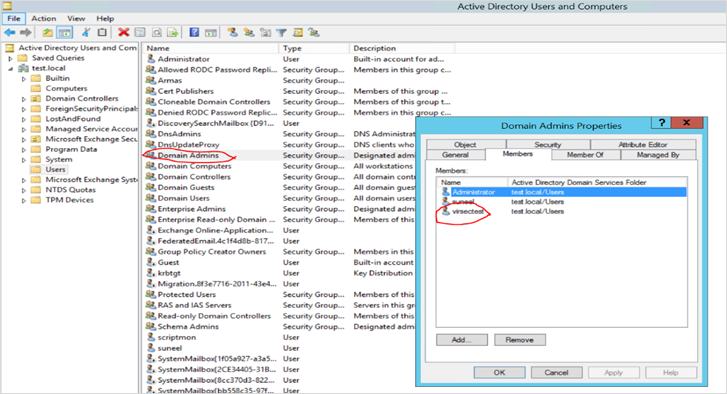
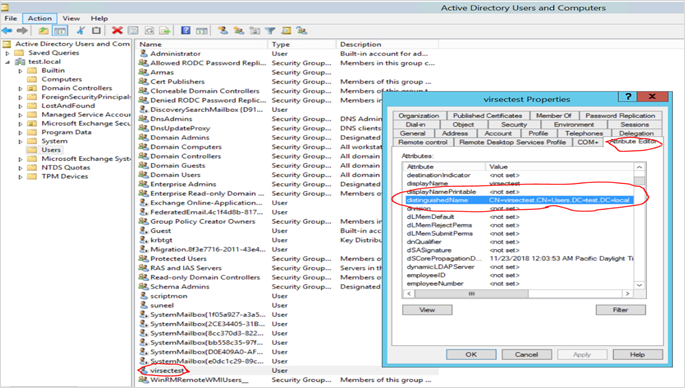
- Procure the Bind DN (username) value from the Attribute Editor tab
Bind Password
- If the password must be reset, right-click on the listed user and select the option Reset Password
Procure LDAP User Binding Parameters
Bind DN
- The value is same as Bind DN (username) except the “CN=<value>” in the beginning
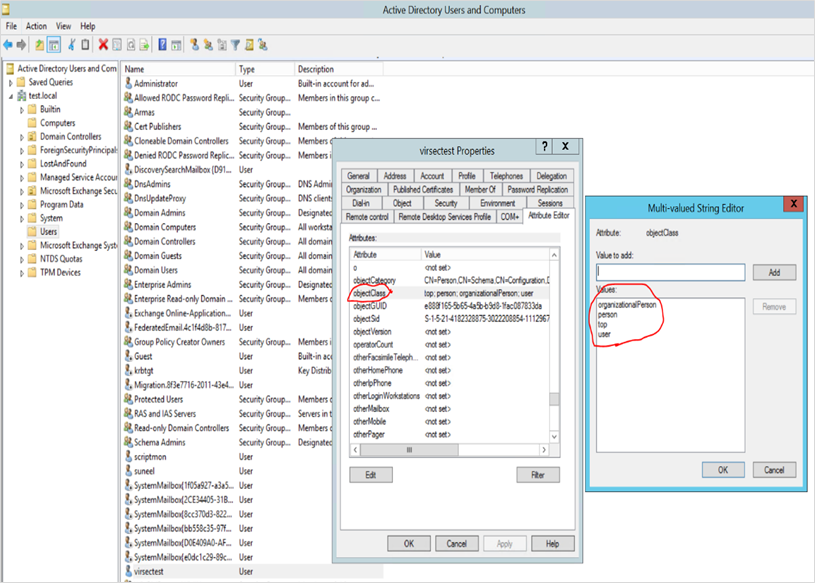
User Attributes
- Right-click on the required user
- Select Properties
- Navigate to Attribute Editor tab
- Procure the attributes from objectClass and provide the required Value. Example: person
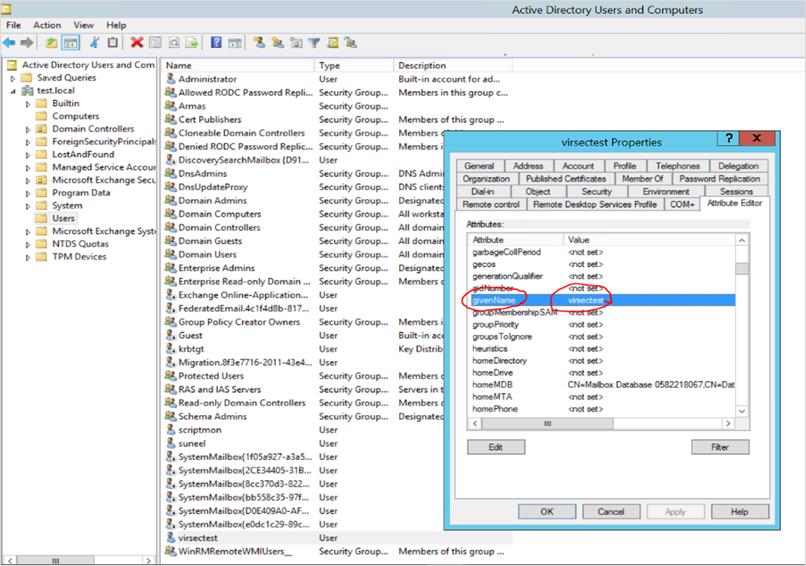
GivenName
- Right-click on the required user
- Select Properties
- Navigate to Attribute Editor tab
- Provide the value of the attribute givenName
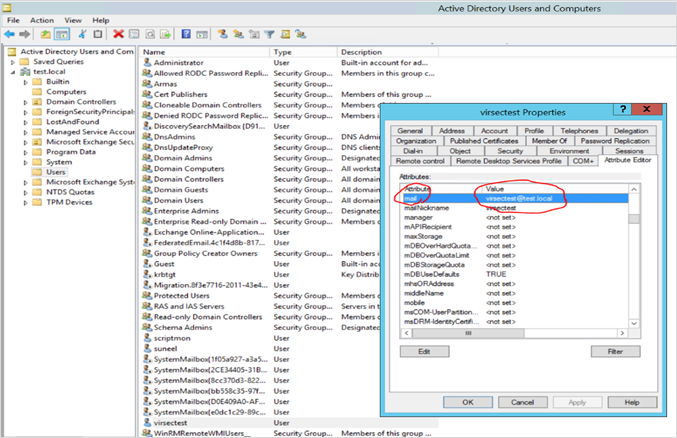
Email Attribute
- Right-click on the required user
- Select Properties
- Navigate to Attribute Editor tab
- Provide the value of the attribute mail