About this Article
This article provides information related to the Probe installation with a Proxy Server associated with SaaS CMS instance. This configuration is preferred in cases where the Probe instances do not have internet connection to communicate with SaaS CMS instance.
Proxy Server Installation
Method 1:
The minimum pre-requisites for CMS Proxy Server installation are:
- VM with the below configuration:
- Operating System: Red Hat Enterprise Linux Server 7.9
- Minimum Requirements:
- 4 CPU Cores
- 8 GB RAM
- 100 GB Disk Space
- Allocate four IPV4 IPs (one Primary and three additional) to the primary interfaceNOTEAllocate number of IPs based on number of CMS Kafka broker URL (Ideal configuration is one Primary IP for CMS and the remaining three secondary IPs for Kafka broker connections)
- For more information about VM deployment, refer to the article Deploy OVF Template on ESXi
- Ensure that Docker Version 20.x is installed
- To install docker and docker compose, log in to the VM via SSH and execute the commands below:Shell
sudo su         #switch to administrator
subscription-manager register --username username --password password -- auto-attach        #register machines with your redhat subscription to download dependencies.
yum update
subscription-manager repos --enable=rhel-7-server-rpms --enable=rhel-7- server-extras-rpms --enable=rhel-7-server-optional-rpms
sudo yum install -y
https://dl.fedoraproject.org/pub/epel/epel-release- latest-7.noarch.rpm
sudo yum install -y yum-utils device-mapper-persistent-data lvm2
sudo yum-config-manager --add-repo
https://download.docker.com/linux/centos/docker-ce.repo
sudo yum install docker-ce
sudo systemctl enable --now docker.service
docker version    #verify docker version
- To install docker and docker compose, log in to the VM via SSH and execute the commands below:
- Enable internet access (HTTP and TCP traffic)
- Enable IPTables rules to route the CMS and Kafka traffic: Log in to the VM via SSH. Configure Iptables rules to route CMS and Kafka traffic using the commands below: Shell
sudo su #switch to administrator iptables -t nat -A PREROUTING -p tcp --dst <Proxy-VM-IP2> --dport 9194 -j DNAT --to-destination <Proxy-VM-Primary-IP1>:6194 iptables -t nat -A PREROUTING -p tcp --dst <Proxy-VM-IP3> --dport 9194 -j DNAT --to-destination <Proxy-VM-Primary-IP1>:7194 iptables -t nat -A PREROUTING -p tcp --dst <Proxy-VM-IP4> --dport 9194 -j DNAT --to-destination <Proxy-VM-Primary-IP1>:8194- The parameters Proxy-VM-Primary-IP1, Proxy-VM-IP2, Proxy-VM-IP3, Proxy-VM-IP4 IP are configured during OVF deployment (Click here for more information about OVF deployment)
- Deploy and start the Proxy Server using the command:Shell
docker run --name vsp-proxy -e CMS_DNS=<CMS_Address> -e KAFKA_DNS1=<Kafka_Address1> -e KAFKA_DNS3=<Kafka_Address3> -e KAFKA_DNS2=<Kafka_Address2> -e WORKER_CONNECTIONS=4096 -p 443:443 -p 8194:8194 -p 7194:7194 -p 6194:6194 --restart=always -d artifacts.virsec.work/vsp/qa/3/3.0/3.0.0-rc1/nginx-proxy:lanight
- Procure the below information during the Onboarding process:
- URLs: “SaaS_CMS_Domain”, “int-SaaS_CMS_Domain”, CMS Kafka broker URL
- CMS SuperAdmin credential
Method 2:
- Deploy Virsec-provided OVA. For more information about VM deployment, refer to the article Deploy OVF Template on ESXi
- Log in to the deployed VM using the credentials provided by Virsec
- Configure the IP addresses in the file /etc/sysconfig/network-scripts/ifcfg-ens160. There are 4 IP addresses configured in this file. Depending on number of Kafka brokers running on CMS, set up the IP addresses. Ideal configuration is one Primary IP for CMS and the remaining three secondary IPs for Kafka broker connections
3. Execute the below command to complete the VM setup
cd /home/virsec ./setup.sh -h ## To view the help menu ./setup.sh -C <CMS_ADDRESS> -K <KAFKA_ADDRESS_1, KAFKA_ADDRESS_2, KAFKA_ADDRESS_3> - The accepted parameters are:
Parameter Description -C <CMS_ADDRESS> (Required) SaaS CMS IP Address -D <DNS_SERVER> (Optional) DNS server to use for DNS resolutions. Default value is 8.8.8.8 -K <KAFKA_ADDRESS>
(Optional) Comma-separated Kafka Broker IPs. Default value is CMS IP Address -L <LFR_ADDRESS>
(Optional) LFR IP Address. Default value is CMS IP Address -P <WORKER_PROCESSES>
(Optional) Number of worker processes for Nginx. Default value is 1 -W <WORKER_CONNECTIONS>
(Optional) Number of worker connections for Nginx. Default value is 1024
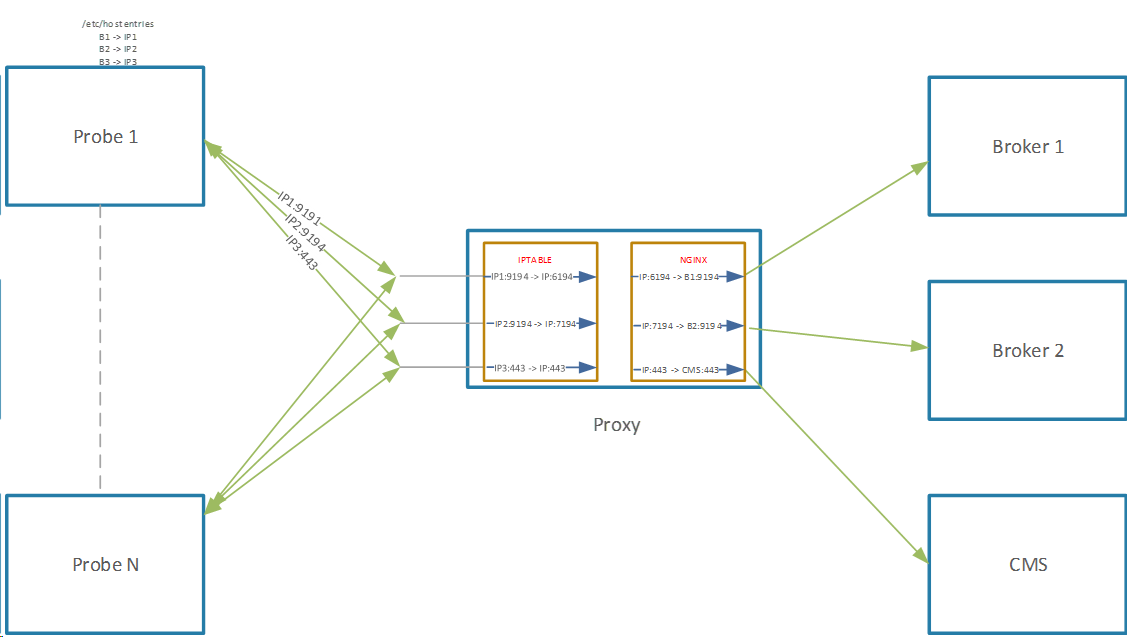
Proxy Architecture
The Proxy server architecture is depicted below:
Communication Matrix
Ensure that the listed firewall rules are established for seamless communication among them. It includes all the ports utilized by VSP components.
- Client - VSP Probe (Deployed on customer workload)
- Server - CMS Proxy
- Client Port - Any
- Server Port on Internal Subnet - 443, 6194, 7194, 8194, 9194
- Protocol - TCP
Launch CMS Proxy Docker Container
- Log in to the VM using SSH. Launch CMS Proxy Docker Container using the commands:Shell
sudo su #switch to administrator docker login artifacts.virsec.work docker pull artifacts.virsec.work/<nginx-proxy-container-path>/nginx-proxy:latest docker run --name vsp-proxy -e CMS_DNS=int-<SaaS_CMS_Domain> -e KAFKA_DNS1=<Broker1> -e KAFKA_DNS3=<Broker3> -e KAFKA_DNS2=<Broker2> -e WORKER_CONNECTIONS=32768 -p 443:443 -p 8443:8443 -p 8194:8194 -p 7194:7194 -p 6194:6194 --restart=always -d artifacts.virsec.work/<nginx-proxy-container-path>/nginx-proxy:latest- Sample value for the parameter <nginx-proxy-container-path>: artifacts.virsec.work/vsp/qa/3/3.0/3.0.0-rc2/nginx-proxy:latest
- The values <Broker1>, <Broker2>, <Broker3> URL and <SaaS_CMS_Domain_URL> are obtained as part of the Onboarding process
- The parameter WORKER_CONNECTIONS is configured to the value 32768 that supports 700 probes
- To stop the proxy container, execute the commands:Shell
docker kill vsp-proxy docker rm vsp-prox - Download the required certificates and the VSP wrapper script (for probe installation) using the below commands:Shell
mkdir -p /home/virsec/temp_dir cd /home/virsec/temp_dir wget <https://<CMS-Public-Domain>>/rms/download/tenantcerts --user <CMS-USER> --ask-password wget <https://<CMS-Public-Domain>>/rms/download/tenantcerts?type=zip --user <CMS-USER> --ask-password tar -xvf tenantcerts wget --certificate=./saasClientCert.crt --private-key=./saasPrivateKeyrsa.key --ca-certificate=./saasRootCA.pem <https://int-<CMS-Public-Domain>>/lfr/vsp/vsp_install_vm.sh wget --certificate=./saasClientCert.crt --private-key=./saasPrivateKeyrsa.key --ca-certificate=./saasRootCA.pem <https://int-<CMS-Public-Domain>>/lfr/vsp/vsp_install_vm.bat- The above commands download the files tenantcerts, certificates.zip, vsp_install_vm.sh, vsp_install_vm.bat
- Transfer these file to probes using any available orchestration mechanisms
- The value for the parameter <CMS-Public-Domain> URL is obtained from the Virsec team after SaaS CMS setup
Probe Installation
Log in to the VM via SSH to install the Probes.
Linux
- Install VSP agent using commands:Shell
sudo su ##switch to administrator mkdir /tmp/vspfiles - Download the files tenantcerts (generated in the previous section) and vsp_install_vm.sh to probeShell
cp tenantcerts vsp_install_vm.sh /tmp/vspfiles
cd   /tmp/vspfiles
chmod +x  vsp_install_vm.sh
./vsp_install_vm.sh -c <Proxy-VM-Primary-IP1> -C int-<SaaS_CMS_Domain> -s <sku> -T /tmp/vspfiles/tenantcerts -k <Proxy-VM-IP2>,<Proxy-VM-IP3>,<Proxy-VM-IP3> -K <Borker1>,<Brokr2>,<Broker3> -m 1 -r 1
Parameter Description -c <Proxy-VM-Primary-IP1> Proxy VM IP Address -C <SaaS_CMS_Domain> CMS SaaS domain -k <Kafka Proxy VM IP Addresses> Comma-separated Proxy VM IP Addresses -K <Kafka Broker URLs> Comma-separated Kafka broker URLs - The options, used in the above command, add entries to the file /etc/hosts in the Probe machine for the URLS provided along with -C and -K options. It is added to resolve the IP addresses provided using the parameters -c and -k
- The parameters Proxy-VM-Primary-IP1, Proxy-VM-IP2, Proxy-VM-IP3, Proxy-VM-IP4 IP are configured during OVF deployment (Click here for more information about OVF deployment)
- The value for the parameter <SaaS_CMS_Domain> URL is obtained during the Onboarding process
- Do not use the parameter "-H 0" if proxy enablement is required
Windows
- Login As Administrator
- Download the files certificates.zip (generated in the previous section) and vsp_install_vm.bat to probe machineShell
vsp_install_vm.bat -c <Proxy-VM-Primary-IP1> -C int-<SaaS_CMS_Domain> -s <sku> -T %FileLocation%\certificates.zip -k <Proxy-VM-IP2>,<Proxy-VM-IP3>,<Proxy-VM-IP3> -K <Borker1>,<Brokr2>,<Broker3> -m 1 -r 1Parameter Description -c <Proxy-VM-Primary-IP1> Proxy VM IP Address -C <SaaS_CMS_Domain> CMS SaaS domain -k <Kafka Proxy VM IP Addresses> Comma-separated Proxy VM IP Addresses -K <Kafka Broker URLs> Comma-separated Kafka broker URLs - The above options add entries to the file /etc/hosts in the Probe machine for the URLS provided along with in -C and -K options. It is added to resolve the IP addresses provided using the parameters -c and -k
- The parameters Proxy-VM-Primary-IP1, Proxy-VM-IP2, Proxy-VM-IP3, Proxy-VM-IP4 IP are configured during OVF deployment (Click here for more information about OVF deployment)
- The value for the parameter <SaaS_CMS_Domain> URL is obtained during the Onboarding process
- Do not use the parameter "-H 0" if proxy enablement is required