The ability to detect attacks and malicious activities that target the infrastructure of organizations is the primary responsibility of any security solution. Responding proactively as soon as attacks and threats are detected is the goal of all security solutions. The VSP Protection Engine can be configured to provide appropriate responses to meet the security needs of a business.
Pre-requisites
The pre-requisites for protection engine are:
- Installation and configuration of VSP Probe on the App Instance
- Probe MUST be registered with CMS and be online
Generate Action
Follow the steps below to generate specific Protection actions. This is optional. If Protection action is not desired, proceed with steps in Create Protection Profile
- Navigate to Manage > Protection Engine > Action Catalag in the left navigation pane
- Select the appropriate Action type and Click CREATE NEW ACTION
- Host - For Library and Process Monitoring
- Application – For other vulnerabilities
- Web – For VSP-Web (on Web Server) vulnerabilities
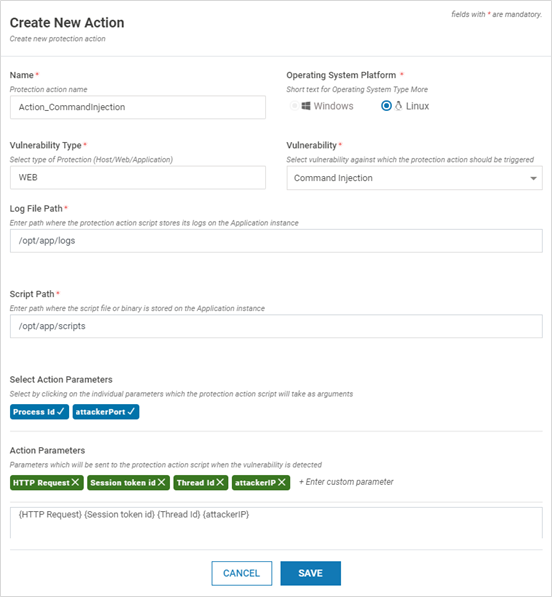
- Provide the below information:
Field Name Description Name Name of the Profile Operating System Platform Select Windows or Linux Vulnerability Type Select Host, Web or Application based on the selected tab in Action Catalag Page Vulnerability Select the appropriate vulnerability from the dropdown against which the protection action should be triggered Log File Path Complete Directory path (along with the file name) where the log file of the script must be created. Previously provided paths are provided in the dropdown Script Path Complete Directory path where the protection action script is located along with the file name. Previously provided paths are provided in the dropdown Action Parameters Parameters for the script. Select all the parameters from the list by clicking each one in the expected order by the script. 
The table below provides the list of available parameters:Vulnerability Available Parameters HOST Process Injection, Process Modification, Library Injection, Library Modification, Library Hijack Event Type, Mod Start, Mod End, Library Path, Library Name, Process Path, Process Name, Parameters, Process Pid, Parent Pid, Parent Process Name, Process Checksum, Library Checksum Parent Process Violation, Child Process Violation, Process Disallowed, Command-Line Violation, Script Monitoring, Access Control Violation Event Type, Mod Start, Mod End, Path, Name, Process Path, Process Name, Parameters, Process Pid, Parent Pid, Parent Process Name, Process Checksum, Script Checksum Memory Integrity Event Type, Checksum, Mod Start, Mod End, Process Path, Process Name, Parameters, Process Pid, Process Checksum APPLICATION SQL Injection, CRLF Injection, Command Injection, Path Traversal, CSRF, Stored Cross-Site Scripting, Reflected Cross-Site Scripting, DOM XSS, XML Injection, Custom Injection HTTP Request, Session token id, Process Id, Thread Id, attackerIP, attackerPort Buffer Error Process Id, Thread Id, Source Memory Address, Source Module Start Address, Destination Memory Address New File, File Renamed, File Removed, File Modified filename, filepath, virsechash, ipaddress, filetype, alerytype, symboliclink, linkpath Software Exception Logging, Class Load Logging NA Local File Inclusion, Remote File Inclusion HTTP Request, Session token id, Process Id, Thread Id, attackerIP, attackerPort, filepath, Remote HTTP Request Protocol Enforcement HTTP Request, Unique Transaction ID, attackerIP, attackerPort, Matched Rule File, Threat Description, Severity, Threat Score, Tags WEB SQL Injection, CRLF Injection, Command Injection, Stored Cross-Site Scripting, Reflected Cross-Site Scripting, Custom Injection HTTP Request, Process Id, Thread Id, attackerIP, attackerPort Buffer Error Process Id, Thread Id, Source Memory Address, Source Module Start Address, Destination Memory Address Local File Inclusion, Remote File Inclusion, Protocol Enforcement, XML Injection HTTP Request, Unique Transaction ID, attackerIP, attackerPort, Matched Rule File, Threat Description, Severity, Threat Score, Tags - Click SAVE
- The created action is listed on the Actions page
Create Protection Profile
To create Protection Profile, follow the steps below
- Navigate to Manage > Protection Engine > Profiles in the left navigation pane. Click ADD PROTECTION PROFILE
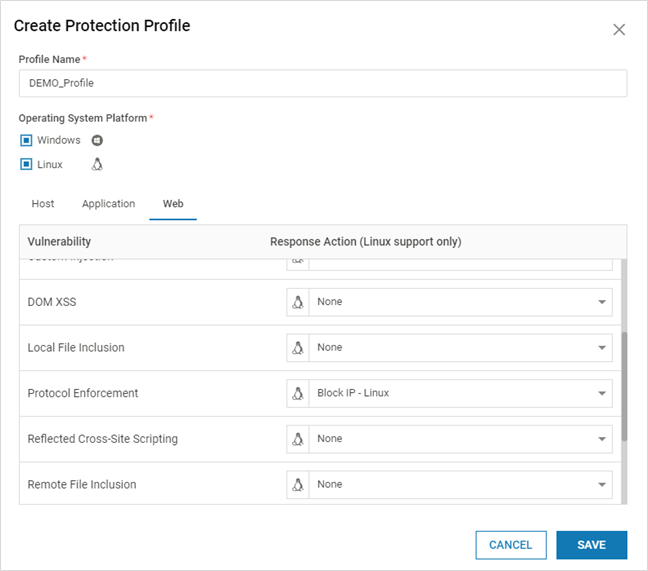
- Provide Profile Name and select the applicable Operating System Platform(s). Ensure that the Profile Name does not contain any special character
- Based on Profile scope, select the tab (Host, Application, Web) and select the required actions for Vulnerabilities from the dropdown. Click SAVE

Protection Profile List on CMS
The list of Protection Profiles can be viewed on CMS
- Navigate to Manage > Protection Engine > Profiles in the left navigation pane. The list of all the created protection profiles is displayed
- The first column indicates the OS type – Windows, Linux or both
- The Application Actions Mapping count and Host Action Mapping count are also displayed
- Click the listed profiles to view the types of Vulnerabilities configured. Expand the listed type to view more information

Import/Export Protection Profiles
Export and import of Protection Profiles can be used when VSP protection is extended to a different environment (Example: Pre-production to Production environment)
- Protection Profiles can be imported or exported with .virsec extension

- Ensure that import/export operations are carried out in the same VSP version. Import/export feature is compatible across various patches in the same major release (Example: VSP 2.8.x)
Clone Action
- Click the Clone Protection Action to clone an existing Protection Action

- Modify the Action Name and other required information. Click SAVE
Clone Protection Profile
- Click the Clone Protection Profile to clone an already existing Protection Profile

- Modify the Profile Name and other required information. Click SAVE
- The newly cloned profile is listed in the Profiles page
Modify Action
- To modify a user-defined action, click Edit on the Action Catalag page

- Modify as required Click SAVE
Delete Action
- To delete a user-defined action, click Delete on the Action Catalag page

- Click YES on the pop-up window to confirm deletion
Modify Protection Profile
- On the Profiles page, click Edit on the profile which requires modification

- Modify as needed. Click SAVE
- New Operating System Platform can be added. But existing OS platform can not be removed
Delete Protection Profile
- On the Profiles page, click Delete. Click YES on the pop-up window to confirm deletion
- Alternatively, for each profile, a vulnerability type can be deleted. Click on the profile and delete the required vulnerability type. Click YES on the pop-up window to confirm deletion
