Probe Troubleshooting
- 12 Apr 2024
- 10 Minutes to read
- Print
- DarkLight
- PDF
Probe Troubleshooting
- Updated on 12 Apr 2024
- 10 Minutes to read
- Print
- DarkLight
- PDF
Article summary
Did you find this summary helpful?
Thank you for your feedback!
About this Article
This article lists the common issues encountered in Probe, their possible causes and recommended work around.
Procure VSP Information from Library or DLL File
Version 2.11 and Above: To procure information related to VSP from a library or DLL file:
- Right-click on the file and click Properties
- Navigate to the Details tab to view the VSP version and build date
Probe unable to connect with CMS
Symptom: Probe is unable to connect with CMS with the error “Certificate verify failed”
Possible Cause: Time on the Probe server might be wrong
Recommended Actions: Ensure that the current time is updated on the server manually or using an NTP server
Attach to Running Container
- Log in to the worker node where the application pod is deployed
- Execute the below command to procure the runtime hash of the application container and sidecar containerShell
- Execute the below command to attach to the running containerShell
Gather VSP logs for debugging
Utilize the logging scripts to create set debug mode for all components and create a zip/tar file comprising all the VSP-related log files.
- Windows
cd C:\Program Files (x86)\Virsec\scripts ./vsp_logs.bat -h # For Help Menu - Linux
cd /opt/virsec/scripts ./vsp_logs.sh -h # For Help Menu - Below table shows available logging scripts parameters
Parameter Required/Optional Description -d Optional Set debug mode for all components -x Optional Provide the password if the probe is password-protected -t Optional Get the tar file and reset the log levels to the previous state Options to be utilized only with parameter -t -l Optional Location of the zip/tar file. The default values are C:\ProgramData\Virsec (Windows) and /var/virsec (Linux) -s Optional To collect system events logs and application logs along with VSP logs -4 Optional To obfuscate IPv4 Addresses in the input log file -6 Optional To obfuscate IPv6 Addresses in the input log file -i Optional To obfuscate hostname in the input log file -r <regex_file> Optional To use a file with regular expression for obfuscation -e Optional To encrypt objects that match a pattern -p <password> Optional To configure password for encryption
Common Commands
- Start/List the VSP Services:
- Windows:
sc start vsp - Linux:
service vsp start
- Windows:
- Confirm the status of the VSP services using:
vsp-cli list [--pids] - Stop all the VSP Services
- Windows: (Provide the password once prompted only if password is set)
vsp-cli stop all - Linux:
service vsp stop
- Windows: (Provide the password once prompted only if password is set)
- Restart the VSP Service
- Windows: (Provide the password once prompted only if password is set)
vsp-cli restart all - Linux:
service vsp restart
- Windows: (Provide the password once prompted only if password is set)
VSP-Cli Usage
The VSP-cli tool is used to interact with VSP probe instance. It has a rich set of functionalities that enable a standardized interface to the VSP probe. This section describes the tool usage
- Query or modification of VSP configuration or services is only through VSP-cli
- VSP-cli can be executed only by users with admin (Windows) OR root (Linux) privileges
- If password protection is not enabled, all users with admin/root privileges can modify the parameters
VSP-Cli Help Menu
- Access the help menu using the below command:
vsp-cli -h - Each subcommand also has its own help menu. A sample command is given below:
vsp-cli list -h
View/Edit VSP Service Configuration
- View the configuration values of any service using:
vsp-cli config <service name> view [--options]- Example:vsp-cli config HMM view [--options]
- Edit the existing configuration values using:
vsp-cli config <service name> edit logLevel Debug- Example: vsp-cli config HMM edit logLevel Debug
NOTE
While specifying any directory, ensure that “\” is provided with proper escape characters. Example: Provide the value as D:\\\\myApp to specify the directory: D:\\myApp
Log file Locations
- Execute the below command to view the log file location
vsp-cli log <service name> location- Example: vsp-cli log HMM location
- Below command is to export and save the logs
vsp-cli log <service name> export ./logs.tar.gz- Example: vsp-cli log HMM export ./logs.tar.gz
Password Reset
- Execute the below command to check whether password is set
vsp-cli check-password- Output: true (password is set)/ false (password is not set)
- Reset the password using one of the options below:
- Provide the old and new password when prompted:
ORvsp-cli reset-password - Provide the old and new password as arguments:
vsp-cli reset-password -o <current password> -p <new password>
- Provide the old and new password when prompted:
Debugging VSP-cli
To debug any errors with VSP-cli utility, execute the below command to obtain more information:
vsp-cli --debug list- Scenario:VSP-cli returns the below output
"Unable to obtain file lock for
/opt/virsec/config/vsp_service_list.json"
"Unable to find valid VSP service list"- Recommended Workaround:
Delete the file /opt/virsec/config/vsp_service_list.json.lock and execute VSP-cli command as required
- Recommended Workaround:
VSP-Manager Service
The VSP-manager service is the primary VSP process that manages the rest of the VSP probe services. The VSP-manager log provides detailed information regarding any errors encountered during the process lifetime. This section covers some common errors encountered.
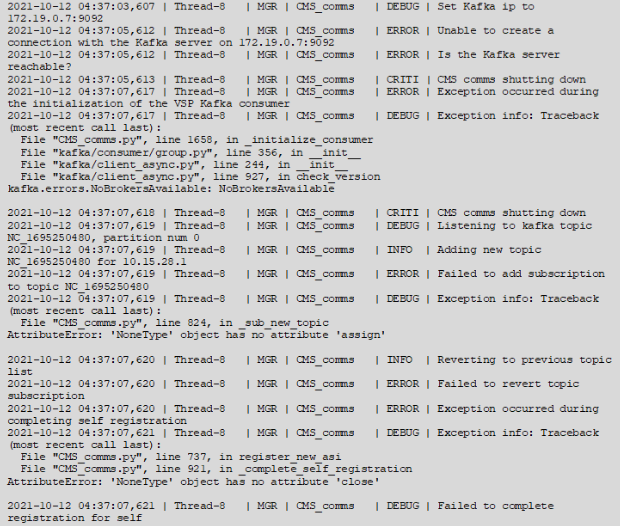
VSP-Manager to VSP Kafka Connection Failures
The root cause for the failures can be:
- The CMS instance was not deployed with the “-x” option:
- This option exposes the internal Kafka server to external connections
- Without this option, a VM VSP probe instance is not able to connect to a kubernetes-based CMS instance
- The environmental variable VSP_KAFKA_HOSTNAME_ENVis not configured with the right value
- Using the VSP installer, ensure that an appropriate value of VSP Kafka IP is provided to the parameter “-k <kafka_server_ip>”. This is used to update the hosts file on the Probe instance
- Additionally, ensure that the terminal used to execute the below command has the environmental variable VSP_KAFKA_HOSTNAME_ENV defined
service vsp start - The sample log entries for the error is provided below:
VSP Service Boot Failure
- Upon reboot, VSP-manager boots any VSP service that has the value “boot” for the “trigger” value in the configuration file: $VSP_HOME/config/vsp_service_list.json
- If any of these VSP services fails to boot, VSP-manager logs it
- Recommended Action:
- Manually start the process with the same command shown in the VSP-manager log. If there is any output printed to stdout/stderr, attach it as a part of the report that is sent to Virsec
- Check the VSP service log to get more information. The service log location can be obtained using:
vsp-cli log <VSP service> location
VSP-Watchdog Failure
If there are errors related to starting the VSP-watchdog service, parallel instances of the VSP probe may be running. To confirm the actual cause, follow the below steps:
- Linux:
- Execute the below command to determine if there are VSP services running
ps aux –forest - If the services are running, execute the below commands:
[sudo] pkill -9 vsp-manager [sudo] pkill -9 vsp-watchdog [sudo] pkill -9 vIPC-server [sudo] pkill -9 hmm - Kill any other VSP service using the same command
- Execute the below command to determine if there are VSP services running
- Windows:
- Access the Task Manager to determine if VSP services are running. If the services are running, stop them using the Task Manager
- After ensuring that all VSP services are stopped:
- Delete the file: $VSP_VAR_HOME/vsp_state/vsp_process.pkl
- Restart all VSP services
vIPC-Server
vIPC-Server is responsible for handling all the communication between VSP services through shared memory.
The vIPC Framework enables inter-process communication among all the VSP services via the VSP-vIPC client libraries. The vIPC-Server log provides information regarding the VSP services that have started. By default, the vIPC Framework enables statistics that are largely helpful in determining any vIPC errors.
This section covers some common errors encountered.
vIPC_init() Failures
- Review the vIPC-Server log to determine if the vIPC-Server received the initialization attempt by the VSP component
- If it is received, the vIPC-server logs any errors faced during the initialization phase
- If it is not received, the error has occurred in the upstream components
vIPC_send() Failures
- Each vIPC-Client library is capable of logging its own statistics in the VSP stats directory - /vspstats (Linux) and R:\\vspstats (Windows)
- The statistics can be enabled via the VSP component that is using the vIPC client library
- It provides information about the error, the number of successful messages sent and received
Windows (2008 R2) Patch for Probe Installation
- Windows Patch: Security Update for Microsoft Windows (KB4474419)is a pre-requisite for VSP Probe installation on Windows 2008 R2. If the patch is not installed, the below error is encountered during Probe installation:
VSP requires the following Windows 2008 patch to be installed. Please install patch and try again.
......................... PREREQUISITE .................................
Apply following Windows patch before installation or look for Windows Patch KB4474419"
https://www.catalog.update.microsoft.com/search.aspx?q=kb4474419
......................................
Windows 2003
In Windows Server 2003, there may be valid Microsoft files that have to be manually whitelisted even though it may have a valid publisher. If any publisher trust issues are encountered, follow the below steps to resolve them:
- Right-click on the untrusted executable or the library and click Properties
- Navigate to the tab Digital Signatures
- Select the signature displayed in the list. Click Details. It may take a few minutes for the pop-up window to be displayed. The error information is displayed on the pop-up window
- Scenario 1:
- Error Message:The integrity of the certificate that signed this file cannot be guaranteed
- Possible Cause: The host is missing the Knowledge Patch that adds SHA2 support
- Recommended Action: This file must be allowlisted on CMS manually. Alternatively, the Knowledge Base Patch can be installed. Follow the steps in SHA-2 Certificates section
- Scenario 2:
- Error Message: A certificate chain processed, but terminated in a root certificate which is not trusted by the trust publisher
- Possible Cause: We need to add the root certificate of this executable
- Recommended Action: Follow the steps in Root Certificate Addition section
- Scenario 3:
- Error Message: This digital signature is OK (But, the publisher is not listed in VSP)
- Possible Cause: The root certificate is installed in the wrong store
- Recommended Action: Follow the steps in Certificate Installed in Wrong Store section
- Scenario 4:
- Error Message: The certificate may be corrupted or may have been altered
- Possible Cause: Windows Server 2003 does not natively support SHA2 certificates. Microsoft has deprecated the signing of SHA1 Root certificates a few years ago. So, for newer executables that are signed with SHA2, Windows Server 2003 cannot authenticate unless there is a Knowledge Base patch installed on the Server.
- Recommended Action: Follow the steps in SHA-2 Certificates section
SHA-2 Certificates
- Execute the below Command:
wmic qfe list full /format:table | findstr /i "3072630"
- If the command output is similar to the screenshot above, the security patch update that adds SHA2 certificate support is installed on the host. Without this update, any executable that has SHA2 certificate (Including Virsec Systems executables) will have to be manually added to the whitelist in CMS
- If the output does not list anything, install the update:
- Access the link: https://www.catalog.update.microsoft.com/Search.aspx?q=KB3072630
- For a 64-bit machine, download and install Security Update for Windows Server 2003 x64 Edition
- For a 32-bit machine, download and install Security Update for Windows Server 2003
Root Certificate Addition
- To add the root certificate of an executable, in the same screen that shows the error message, click View Certificate
- DO NOT CLICK Install Certificate. Navigate to Certification Path
- In the Certificate Path screen, click on the certificate that has the Red X symbol on it or the root certificate. Click View Certificate
- The error message displayed is: This CA Root certificate is not trusted. To enable trust, install this certificate in the Trusted Root Certification Authorities store
- The default store used by Certificate Import Wizard is the Local User’s certificate store. To change this, click Place all certificates in the following store > Browse. DO NOT CLICK Automatically select the certificate store based on the type of certificate
- Click Install Certificate
- On the Select the Certificate Store pop-up window, select the checkbox Show physical stores. Expand the folder Trusted Root Certificate Authorities. Select Local Computer
- The path for the Certificate store now displays Trusted Root Certification Authorities\Local Computer
- Click Next > Finish. This installs the certificate into the computer’s certificate store
Certificate Installed in Wrong Store
Follow the steps below in cases where certificate is installed in a wrong store
- Press Start+R and type mmc. Press the return key (Enter)
- Console1 pop-up window is displayed. Navigate to File > Add/Remove Snap-in..
- In the new pop-up, click Add > Certificates > Add > My user account > Finish
- While the highlighted text is still on Certificates, click Add again
- Click Computer account > Finish > Finish
- Click Close > OK
- The Console Root now shows both Certificates - Current User and Certificates (Local Computer)
- Navigate to Certificates > Current User > Trusted Root Certification Authority > Certificates
- This is the list of all the certificates installed under Current User. Find the required certificate. Right-click on the certificate and press Copy
- Right-click on the folder Certificates (Local Computer) > Trusted Root Certification > Authority/Certificates. Click Paste
RHEL 6.5/6.6 Upgrade to RHEL 6.7+ Issue
Symptom: When RHEL version 6.5/6.6 is upgraded to RHEL version 6.7 or above with VSP installed, it fails with the error "`GLIBCXX_<Version>' not found"
Possible Cause: This is due to the non availability of the required glibc version after the upgrade
Recommended Actions: Follow the below steps:
- Uninstall VSP using CPM or scripts
- Upgrade the RHEL version
- Install VSP again
Unable to download installer script
Symptom: Unable to download the installer scripts during Probe installation. wget command fails with the below error
Possible Cause: The file /etc/hosts is not updated for CMS
Recommended Actions: Add the entry using the below command and retry installer script download
echo “<CMS_IP_Address> int.cms.virsec.com” >> /etc/hostsProbe Installation Failure
Symptom: Probe Installation fails with the below error:
2024-02-12 08:24:42.211660 | Result of ""C:\Program Files (x86)\Virsec\bin\vsp-configure.exe" "C:\Program Files (x86)\Virsec\config\vsp_probe.cfg""
2024-02-12 08:24:42.212398 | Error, couldn't decode attached data.
2024-02-12 08:24:42.213269 | Response Code of ""C:\Program Files (x86)\Virsec\bin\vsp-configure.exe" "C:\Program Files (x86)\Virsec\config\vsp_probe.cfg""
Possible Cause: vcredist package must be installed before VSP Probe installation. This error occurs if this package installation is not complete.
Recommended Actions: Restart the Probe instance and retry installation
Was this article helpful?