VM-based Setup on GCP
- 26 Oct 2023
- 2 Minutes to read
- Print
- DarkLight
- PDF
VM-based Setup on GCP
- Updated on 26 Oct 2023
- 2 Minutes to read
- Print
- DarkLight
- PDF
Article summary
Did you find this summary helpful?
Thank you for your feedback!
About this Article
This article provides environment setup steps for deploying VSP on Google Cloud Platform (GCP) VM.
Pre-requisites
Two VM instances are required for VSP – one for VSP CMS and (Optional - Remote AE only) one for VSP AE.
The pre-requisites for VSP installation:
- VM instance with:
- Docker
- Docker Compose
- Network Security Group with the list of ports utilized by VSP components. Refer to the VM article for information on the ports
Firewall Creation for VM
- Access GCP Dashboard and search for the term “Firewall” and Click the Firewall
- Click CREATE FIREWALL RULE
- Provide the below information:
- Name: SSH-firewall
- Description: SSH-firewall that allows SSH and required ports to the Virtual Machine
- Direction Of Traffic: Ingress
- Action On Match: Allow
- Targets: Choose Specified Target Tags
- Target Tags: SSH-firewall
- Source Ipv4 ranges: 0.0.0.0/0
- Protocols and Ports: Select the the tcp box and provide the value: 22,80,443,55555,9092
- Click SAVE to create a new firewall
GCP Machine Creation
- On the GCP console, search for “VM”. Click CREATE INSTANCE
- Provide the below information:
- Name: docker-compose
- Region: us-west-1
- Zone: us-west-1a
- Machine family:Select the below option according to the CMS Deployment Type:
- Large: e2-standard-16 (16vcpu, 64Gb Memory)
- Small: e2-standard-8 (8vcpu, 32Gb Memory)
- Service Accounts: Compute Engine Default service account
- Access Scopes: Allow full access to all cloud APIs
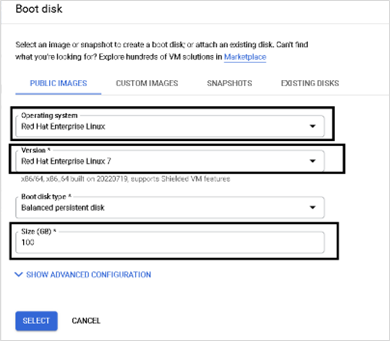
- Click CHANGE under Boot disk
- Provide the required information. Click SELECT
- Select Service Account and the option Allow full access to all Cloud APIs. Click CREATE to create a new VM
SSH Keys Creation in MobaXterm
- In the MobaXterm Software, navigate to Tools > MobaKeyGen and Click Generate
- Private and public SSH keys are generated after some time
- Provide a valid name in the key comment. Save both the public and private keys in the local machine These keys are utilized for authentication into the machines
- Copy the saved public key. On the Google VM Instances Console, modify the instance as described below:
- Select the newly created instance and click EDIT
- In the Network Tags, provide the Firewall tag created in Section 0. This ensures that the required ports are accessible to the machines
- Click Add Item and provide the copied public key into the two VMs. Save the provided information
- Copy the Key value from the SSH-key generator pop-up window. Provide the copied value to SSH-keys. Click SAVENOTE
To enable custom ports for network security, click Networking and add the inbound port rule so that the VM allows inbound traffic for specified ports.
On the MobaXterm window navigate to Tools > MobaKeyGen if the SSH Key Generator window is closed. Click Load and browse the local system location of the saved private key. The public key is displayed once the loading is complete.
- Open a new session once the information is saved
- Provide the public IP Address, username and your private key
- For the public IP Address, provide IP Address from VM Instances console
- For the private key, browse the local system location of the saved private key
- If all the SSH options are configured correctly, log in to the VM is successful
Installation
- Log in to the two newly created machines using SSH and install Docker and Docker Compose using the commands below:
sudo su subscription-manager register --username <username> --password <password> --auto-attach #Register the machine with the Red Hat subscription to download dependencies yum update subscription-manager repos --enable=rhel-7-server-rpms --enable=rhel-7-server-extras-rpms --enable=rhel-7-server-optional-rpms sudo yum install -y https://dl.fedoraproject.org/pub/epel/epel-release-latest-7.noarch.rpm sudo yum install -y yum-utils device-mapper-persistent-data lvm2 sudo yum-config-manager --add-repo https://download.docker.com/linux/centos/docker-ce.repo sudo yum install docker-ce sudo systemctl enable --now docker.service sudo curl -L "https://github.com/docker/compose/releases/download/1.29.x/docker-compose-$(uname -s)-$(uname -m)" -o /usr/local/bin/docker-compose sudo chmod +x /usr/local/bin/docker-compose mv /usr/local/bin/docker-compose /usr/bin/ - Verification: Execute the commands below to verify the Docker and Docker Compose versions:
docker version
docker-compose version
Was this article helpful?