VM-based Setup on IBM Cloud
- 08 Sep 2023
- 1 Minute to read
- Print
- DarkLight
- PDF
VM-based Setup on IBM Cloud
- Updated on 08 Sep 2023
- 1 Minute to read
- Print
- DarkLight
- PDF
Article summary
Did you find this summary helpful?
Thank you for your feedback!
About this Article
This article provides environment setup steps for deploying VSP on IBM Cloud VM.
Pre-requisites
The pre-requisites for VSP installation:
- Virtual Server instance with:
- Docker
- Docker Compose
- Network Security Group with the list of ports utilized by VSP components. Refer to the VM article for information on the ports
IBM Cloud - VM Creation
- Access the IBM cloud Dashboard: https://cloud.ibm.com using valid credentials
- Navigate to VPC Infrastructure > Virtual Server Instances > Create Instance
- Provide Instance Name, select Resource Group and add Tags
- Select Operating System as RHEL 7.9 and the Version
- Select Profile and choose the required Profile entry. Example: mx2-8x64
- Select or create SSH keys
- In the section Network Interfaces, click on Security Group
- Configure Security Groups to allow ports 22, 80 and 443. The snapshot is intended for reference only, since it allows the ports for any source IP Address
- Click Create virtual server to launch the Instance
- After a successful instance creation, navigate to Virtual Server Instances and search for the newly created instance
Extending /var filesystem
- Create a new Virtual Server with an additional drive or add a new drive after creation
- Add a new drive at VM creation
- Provide the required values. Click Create. The newly created drive is now listed
- Log in into the VM and execute the command below to find the additional drive:
fdisk -l- Partition the disk using the command:
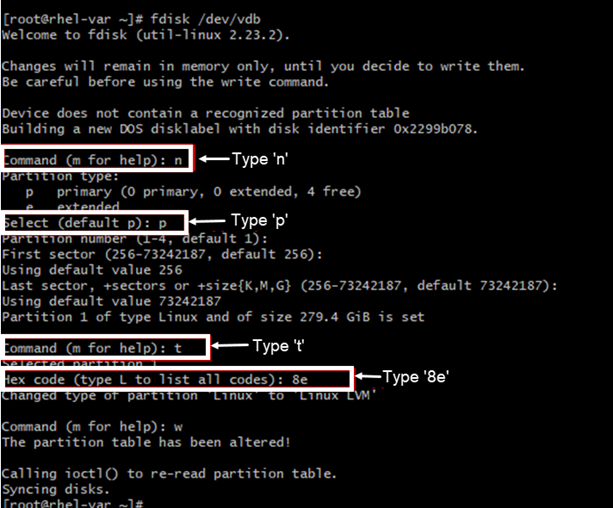
fdisk /dev/vdb - Use option ‘n’ to create the partition
- Use ‘w’ command to save
- Use the commands depicted in the screenshot below:
- Press “Enter” to choose default values on sectors
- Partition the disk using the command:
- Execute the command below to check the mounted disk:
lsblk - Execute the below commands to create new /var directory and mount the created partition with /var
mkfs -t ext4 /dev/vdb1 mv /var /var2 mkdir /var mount /dev/vdb1 /var df -h #For Verification mv /var2/* /var/ - Create a fstab entry to make this change permanent. Open the file /etc/fstab
vi /etc/fstab- Add the entry below and save the file
/dev1/vdb1 /var ext4 defaults 0 0 - Reboot the VM to verify the changes
- Add the entry below and save the file
Installation
- Log in to the two newly created machines using SSH
- Install Docker and Docker Compose using the commands below:
sudo su subscription-manager repos --enable=rhel-7-server-rpms subscription-manager repos --enable=rhel-7-server-extras-rpms subscription-manager repos --enable=rhel-7-server-optional-rpms sudo yum install -y https://dl.fedoraproject.org/pub/epel/epel-release-latest-7.noarch.rpm sudo yum install -y yum-utils device-mapper-persistent-data lvm2 sudo yum-config-manager --add-repo https://download.docker.com/linux/centos/docker-ce.repo sudo yum install docker-ce sudo systemctl enable --now docker.service sudo curl -L "https://github.com/docker/compose/releases/download/1.29.2/docker-compose-$(uname -s)-$(uname -m)" -o /usr/local/bin/docker-compose sudo chmod +x /usr/local/bin/docker-compose mv /usr/local/bin/docker-compose /usr/bin/ - Verification: Execute the commands below to verify the Docker and Docker Compose versions:
docker version
docker-compose version
Was this article helpful?