About this Article
This article provides all information about Webhooks including how to add, list, modify and delete Webhooks.
CMS provides an opportunity to configure Rest APIs to receive notifications of VSP detected incidents. Webhooks provide an ability to integrate with any existing system to trigger macro-protection actions.
Add Webhook
- Navigate to Administration > Webhooks in the left navigation pane. Click ADD WEBHOOK
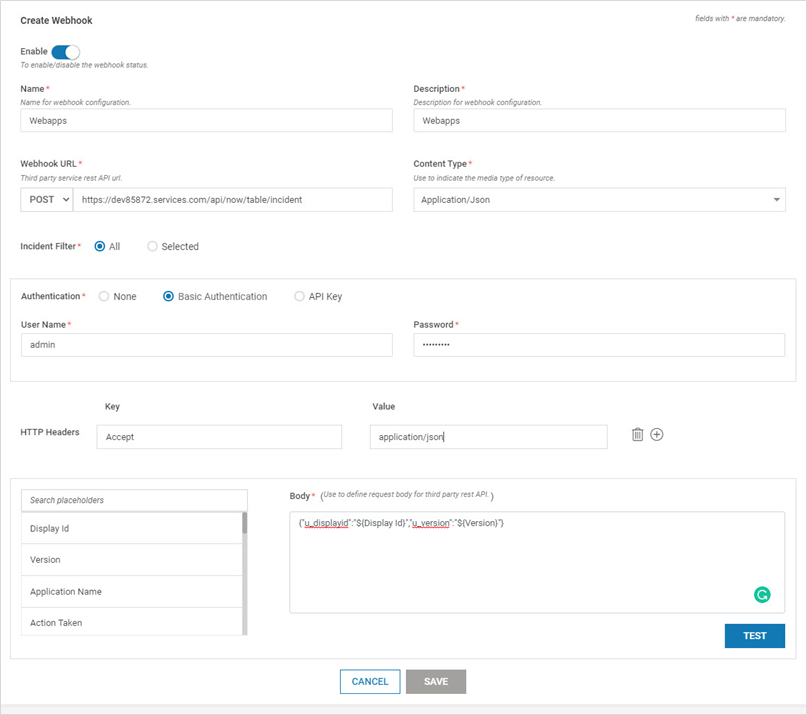
- The table below provides descriptions about various parameters. Provide the information and click TEST to verify the configurations
Parameter Description Enable On – Webhook is added and enabled to receive incidents notification
Off – Webhook is added, but will not receive the incidents notificationName Name of the Webhook Description A short description of the Webhook Webhook URL Rest API URL to be configured. (Currently POST and GET methods are supported) Content Type Currently the only supported format is JSON Incident Filter The webhook can be configured for all incidents or specific incidents based on
- Severity – Threats, Attacks or notifications
- Application – Select the required Applications
- Host – Select the required Hosts
- Category – Web Attack, Fileless Attack, Authentication Failures, File Integrity Failures
- Type – Vulnerability types
- Action – Protection Action is triggered or not
Authentication Provide the authentication information of the API
- None – No authentication
- Basic – Only username and password required
- API Key – Provide the token
HTTP Headers Key – Select the key from the drop-down
Value – Provide the corresponding value
Multiple Key-Value pairs can be addedBody Provide the JSON format expected by the API. Utilize the parameters listed on the page - Click SAVE
Webhooks List on CMS
- Navigate to Administration > Webhooks in the left navigation pane. All the configured Webhooks along with their URLs are displayed
- The webhooks can be enabled or disabled as required
- Click Activity to view the Activity of a particular Webhook

- Click Clone to clone a particular Webhook
Export/Import Host Webhooks
- Webhooks can be imported or exported with .virsec extension

- This feature can be used during the scenario below:
- When VSP protection is extended to a different environment (Example: Pre-production to Production environment)
- Ensure that import/export operations are carried out in the same VSP version. Import/export feature is compatible across various patches in the same major release (Example: VSP 2.9.x)
View Webhooks Activity on CMS
- On the Webhooks page, click WEBHOOKS ACTIVITY
- A list of all the activities are displayed with the Status (Success/Failure), Event ID, Webhook Name, Request URL, Request Time and Response Time
- A click on one event displays more information about it
- The displayed activity list can be filtered based on the Webhook Name, Status OR Time Range
Modify Webhook
- On the Webhooks page, click Edit under action of Webhook which requires modification
- Modify as required. Click SAVE
Delete Webhook
- On the Webhooks page, click Delete under action of Webhook to be deleted
- Click YES on the confirmation screen