Working with Existing Security Solutions
- 13 Dec 2024
- 3 Minutes to read
- Print
- DarkLight
- PDF
Working with Existing Security Solutions
- Updated on 13 Dec 2024
- 3 Minutes to read
- Print
- DarkLight
- PDF
Article summary
Did you find this summary helpful?
Thank you for your feedback!
About this Article
This article provides configuration steps to be followed in security solutions on Probes to ensure VSP works seamlessly along with them
Ensure that either of the two approaches below is implemented (in the order of preference) to ensure that VSP works seamlessly along with an existing security solution:
- Disable any existing security solution (like AV, EDR, HIPS) before VSP Probe is installed
- If the existing security solutions cannot be disabled, ensure that the VSP probe files and folders are excluded from any form of monitoring by them on the server. The locations that need to be excluded are listed below:
- Windows:Text
C:\Program Files (x86)\Virsec C:\ProgramData\Virsec - Linux:Text
/opt/virsec /var/virsec- In some cases where the existing security product might block new kernel modules, allow the below directory as a trusted kernel moduleText
/opt/virsec/rmp/*/bin/*/*/vsysi.ko
- In some cases where the existing security product might block new kernel modules, allow the below directory as a trusted kernel module
- Enable Memory Exploit protection on some test systems initially to ascertain that the required exclusions are working as expected
- Windows:
- The existing security solution must be allowlisted in CMS. By default, it is added to the allowlist if the security solution is present at the time of the scan
Failing to do the above can lead to adverse impacts including system crashes.
The configuration procedures for some of the security solutions are provided in the sections below. For other security solutions, contact Virsec Technical Team for confirmation.
Sophos
- On the Sophos console, navigate to Policies > Base Policy - Lockdown Settings
- Ensure that the files and folders mentioned in the table below are added as to the Allowed list:
- Files:Text
C:\Program Files (x86)\Virsec\bin\vsp-cli.exe C:\Program Files (x86)\Virsec\lib\vsp-inject.dll C:\Program Files (x86)\Virsec\lib\vsp-mem-protect.dll C:\Program Files (x86)\Virsec\lib\vsp-sbuf.dll C:\Program Files (x86)\Virsec\vsp_memory\compatibility_tool\client\hybrid.dll C:\Users\Administrator\Downloads\vsp-host-vm\vsp-host-vm\vm-install.bat C:\Users\Administrator\Downloads\vsp_install_vm.bat - Folders:Text
C:\Program Files (x86)\Virsec\bin\
C:\Program Files (x86)\Virsec\log
C:\Users\Administrator\Downloads\vsp-host-vm\vsp-host-vm      #Installation path of the system
- Files:
- Ensure that the below mentioned directories are added to the Exclusion list in CMS:
- Windows:Text
(?i)C:\\+Program Files \(x86\)\\+Sophos.* (?i)C:\\Program Files\\Sophos.* (?i)C:\\Windows\\System32\\SophosAV.* - Linux:Text
/opt/sophos-spl/plugins/.*
- Windows:
Trend Micro
- Trend Micro, Inc. is added automatically to the Publisher List during the initial scan. This ensures that VSP-Manager.exe is NOT stopped in a Windows system
- On the Trend Micro console, after a successful login, click Workload Security on the dashboard
- Navigate to Computers in the left navigation pane. Double-click the required server

- Navigate to Anti-Malware > General > Real-Time. Click Edit to modify Malware Scan Configuration
- Ensure that Behavior Monitoring is NOT enabled
- Ensure that Activity Monitoring is NOT enabled
- Navigate to Computers in the left navigation pane. Double-click the required server
Cortex
- For Cortex on Linux setup, ensure that the exclusion list for the profile on CMS has the entry:Text
/opt/traps/*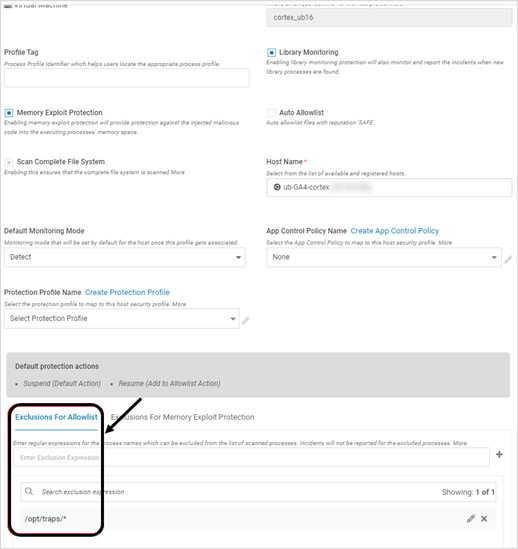
- For Cortex on Windows setup:
- Ensure that the folders mentioned below are added as to the Exclusion list:Text
C:\Program Files (x86)\Virsec\* C:\Program Files (x86)\vspcpm\* C:\ProgramData\Virsec\* C:\ProgramData\virsec-web-mem\* - Ensure that the below files are added to the exclusion list
C:\Program Files (x86)\Virsec\bin\deobfusc.exe
C:\Program Files (x86)\Virsec\bin\filesysmonitor.exe
C:\Program Files (x86)\Virsec\bin\hmm.exe
C:\Program Files (x86)\Virsec\bin\libcrypto-3-x64.dll
C:\Program Files (x86)\Virsec\bin\libssl-3-x64.dll
C:\Program Files (x86)\Virsec\bin\libvspkafkaapi_dll.dll
C:\Program Files (x86)\Virsec\bin\lz4.dll
C:\Program Files (x86)\Virsec\bin\obfusc.exe
C:\Program Files (x86)\Virsec\bin\rdkafka.dll
C:\Program Files (x86)\Virsec\bin\uninstall_password_ui.exe
C:\Program Files (x86)\Virsec\bin\vIPC-server.exe
C:\Program Files (x86)\Virsec\bin\vsp-cli.exe
C:\Program Files (x86)\Virsec\bin\vsp-configure.exe
C:\Program Files (x86)\Virsec\bin\vsp-manager.exe
C:\Program Files (x86)\Virsec\bin\vsp-rmp.exe
C:\Program Files (x86)\Virsec\bin\vsp-watchdog.exe
C:\Program Files (x86)\Virsec\bin\VSPServiceHandler.exe
C:\Program Files (x86)\Virsec\bin\vsp_installer.exe
C:\Program Files (x86)\Virsec\bin\vsp_installer_ca.dll
C:\Program Files (x86)\Virsec\bin\vsp_install_redist.exe
C:\Program Files (x86)\Virsec\bin\fde.exe
C:\Program Files (x86)\Virsec\lib\hmm-sbuf.dll
C:\Program Files (x86)\Virsec\lib\vhmm-utils.dll
C:\Program Files (x86)\Virsec\lib\vhmm_msi_util.dll
C:\Program Files (x86)\Virsec\lib\vIPC-client.dll
C:\Program Files (x86)\Virsec\lib\vsp-hmm-console.dll
C:\Program Files (x86)\Virsec\lib\vsp-hmm-inject.dll
C:\Program Files (x86)\Virsec\lib\vsp-inject.dll
C:\Program Files (x86)\Virsec\lib\vsp-mem-protect.dll
C:\Program Files (x86)\Virsec\lib\vsp-rmp-engine.dll
C:\Program Files (x86)\Virsec\lib\vsp-sbuf-static.lib
C:\Program Files (x86)\Virsec\lib\vsp-sbuf.dll
C:\ProgramData\Virsec\tmp\hmm\hmm.exe
C:\ProgramData\Virsec\tmp\vsp-cli\vsp-cli.exe
C:\ProgramData\Virsec\tmp\vsp-configure\vsp-configure.exe
C:\ProgramData\Virsec\tmp\vsp-manager\vsp-manager.exe
C:\ProgramData\Virsec\tmp\vsp-watchdog\vsp-watchdog.exe
C:\Program Files (x86)\Virsec\ipm\driver\ipm.sys
C:\Program Files (x86)\Virsec\ipm\driver\WdfCoInstaller01.dll
C:\Program Files (x86)\Virsec\hmm\scripts\ProcessHandler.bat
C:\Program Files (x86)\Virsec\hmm\scripts\PsSuspend.exe
C:\Program Files (x86)\Virsec\hmm\driver\VirsecKernelMonitor.sys
C:\Program Files (x86)\Virsec\hmm\driver\WdfCoInstaller01009.dll
- Ensure that the folders mentioned below are added as to the Exclusion list:
Symantec
- If only the base prevention policy is enabled, no action is required
- If any prevention policy is enabled, ensure that the policy is modified to add the below directories to the exclusion list:
- Windows:Text
C:\Program Files (x86)\Virsec C:\ProgramData\Virsec - Linux:
/opt/virsec/
/var/virsec/
- Windows:
- Log in to CMS. Navigate to Windows policies and select the required policy assigned to the host machine and click Edit
- Click Application Rules > Add
- Select Directory and click Next
- Provide a suitable name and the required directory. Click Add

- Once the directory is added, click Apply
- Log into Symantec Web Portal
- Navigate to Assets. Select the asset and re-apply the updated policy
- The changes are applied on the host in 10-20 minutes
SentinelOne
- On the Sentinel Console, navigate to Sentinels in the left navigation pane
- Click Create Exclusion and create exclusions for the below directories:
- Windows:
C:\Program Files (x86)\Virsec C:\ProgramData\Virsec - Linux:Text
/opt/virsec/
/var/virsec/
- Windows:
Microsoft Defender
- To exclude VSP directories from Windows Defender, execute the below commands in PowerShellPowerShell
Add-MpPreference -ExclusionProcess "C:\Program Files (x86)\Virsec"
Add-MpPreference -ExclusionProcess "C:\ProgramData\Virsec"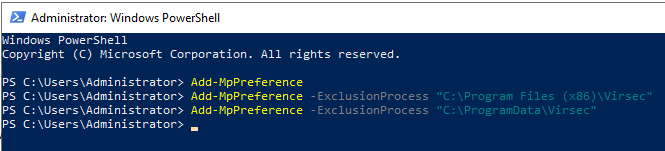
- Ensure that the below mentioned directories are added to the Exclusion list in CMS:Text
C:\Program Files\Windows Defender
C:\ProgramData\Microsoft\Windows Defender
C:\Windows\System32\mpengine.dll
Was this article helpful?