About this Article
This article provides information about the CMS Applications including creation, modification, deletion, association of instances and auto discovery of application.
What is a CMS Application?
Application is the VSP equivalent of Application Workload in your environment. Application Workloads that need VSP-Web or VSP-Memory protection must be created in the CMS to enable VSP protection. The application structure is depicted below: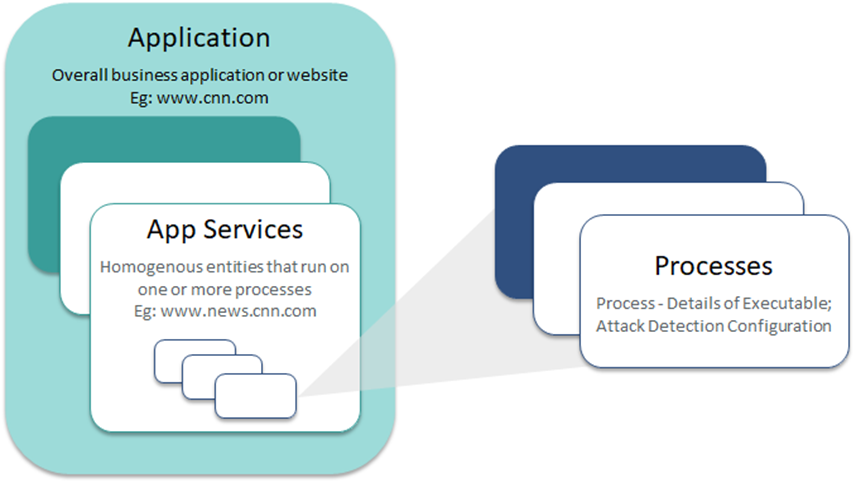
Different Application Status
A Probe can exist in any of the below statuses:
Probe Status | Description |
|---|---|
Unknown | Probe whose status is unknown due to application shutdown, unsuccessful communication with the server OR expired certification installed on the Probe or AE |
Registered | VSP Probe has established a connection with the CMS |
Provisioned | Probe is provisioned (secured) but not started |
Normal | Probe is provisioned (secured), started and monitored by VSP |
Threat | Probe with a minimum of one threat detected by VSP |
Threat Offline | Probe with a minimum of one threat detected by VSP and the application is offline (stopped) |
Attack | Probe with a minimum of one attack detected by VSP |
Attack Offline | Probe with a minimum of one attack detected by VSP and the application is offline (stopped) |
Applications exist in one of the two provisioning status values:
Application Provisioning Status | Color Code |
|---|---|
Provisioned | Green |
Failed | Red |
Create Application
Create a new application on the CMS as described below:
Navigate to Manage > Web > Application Provisioning in the left navigation pane. Click Add Application
Provide Application (Name) and Version (Optional). Click NEXT
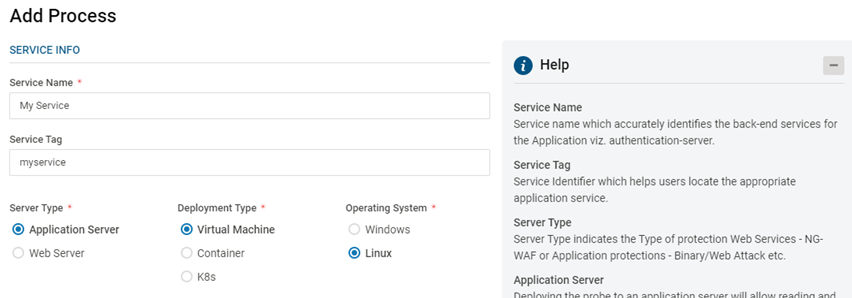
Add Application Server
Provide Service Name, Service Tag, Service Type and Operating System Platform
Provide Service Type as Application Server for Web and Memory Protection
The provided service tag can be utilized during VSP probe installation to enable automatic provisioning into the Application Server
Select the appropriate Deployment Type – VM
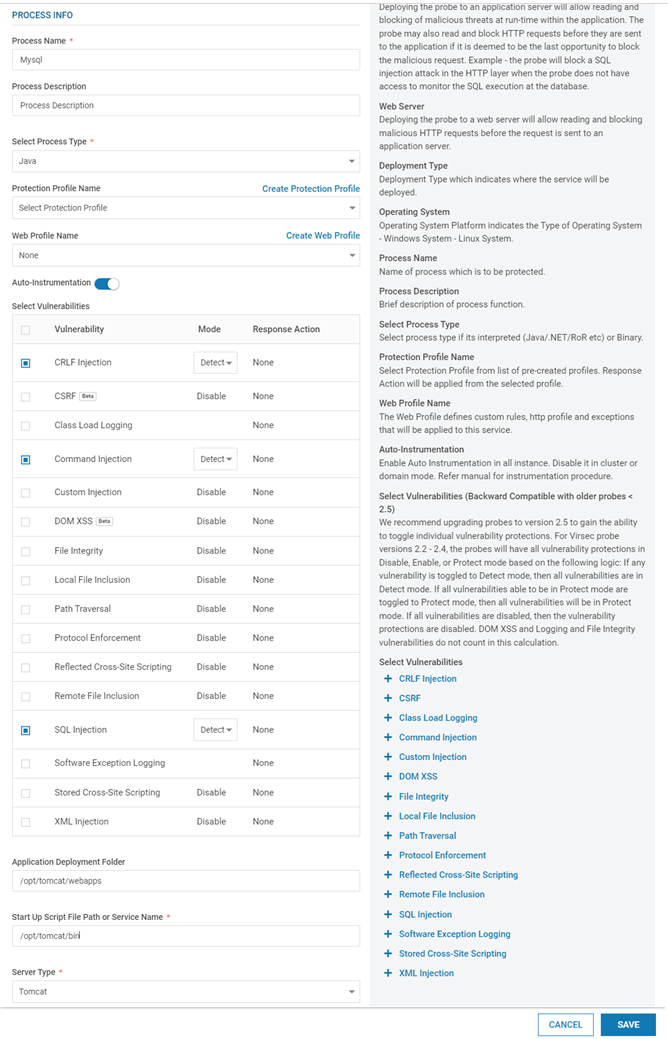
Add Process: Provide the below information
Field Name
Description
Process Name
Name of the Process
Process Description
(Optional) A short description of the Process
Select Process Type
Select the appropriate process type from the drop-down. Eg: Java, Binary, .NET
Protection Profile Name
Select the appropriate Protection Profile from the drop-down. Click here for more information
Web Profile Name
(Optional - For Web protection only) Drop-down list with all available Web Profiles
Select Vulnerabilities
Based on the selected Process Type, select the vulnerabilities against which VSP Protection is desired. The protection level can be configured for each vulnerability. By default, when a vulnerability is selected, the associated protection mode is set to Detect
Note: XML Injection protection includes DTD Injection, also called XML External Entity (XXE) Injection. XXE attacks manipulate the DTD, allowing an attacker to view files or access other network resources to which the server has access. To detect XXE injection, the following vulnerabilities must be enabled - Path Traversal Injection, Remote File Inclusion and Local File Injection
Auto-Instrumentation
Enable – When enabled, instrumentation is performed by VSP at the back end and no manual configurations are required
Disable – When disabled, instrumentation must be performed manually. Click here for more information
Note: Refrain from using auto-instrumentation with WebSphere. Opt for manual instrumentation. Click here for more information
Application Deployment Folder
(For FSM only) Location where the application is deployed. Eg: /opt/tomcat/webapps
File Integrity Exclusion Folders
(For FSM only) List of directories to be excluded from FSM separated by comma. Eg: /opt/tomcat/logs,/opt/tomcat/work
File Integrity Monitored Folders
(For FSM only) List of additional directories to be included for FSM monitoring. Eg: /usr
File Extension Exclusion List
List of file extensions to be excluded from FSM Monitoring. Eg: *.log
Versions 2.9 and Below:
Start Up Script File PathFull path (with the executable name) of the Web Server/Application Server start up script. Eg: /usr/local/apache2/bin/run_apache.sh
Versions 2.10 and Above:
Start Up Script File Path or Service NameFull path (with the executable name) of the Web Server/Application Server start up script. Eg: /usr/local/apache2/bin/run_apache.sh
ORThe service name of the application server if it is configured as Window/Linux service
Server Type
(For VSP-Web only) Select the Server Type from the drop-down. Eg: JBoss, Weblogic, Tomcat
LFI Profile Name
(Optional) Drop-down list with all available LFI Profiles
RFI Profile Name
(Optional) Drop-down list with all available RFI Profiles
Add Web Process: Provide the below information
Field Name
Description
Service Name
Name of the Service
Service Tag
Service Identifier that helps users to locate the appropriate web service
Server Type
Select Web Services
Deployment Type
Select the appropriate type – Virtual Machine
Operating System
Select the appropriate Operating System – Windows OR Linux
Deployment Name
Name of the associated deployment
Web Server Name
Name of the Web Server
Web Server Description
(Optional) A short description of the Web Server
Web Server Type
Select the Web Server type from the drop-down
Web Server Command Line
The exact command line for starting the web server
Protection Profile Name
Select the appropriate Protection Profile from the drop-down. Click here for more information about Protection Profile Creation
Host Name
Provide the <hostname>:<port> values. If multiple applications are deployed on the same Web Server, provide the values for all the hostnames and ports, separated by comma
Web Profile Name
(Optional) Drop-down list with all available Web Profiles. Click here for more information about Web Profile creation
Auto-Instrumentation
Enable – When enabled, instrumentation is performed by VSP at the back end and no manual configurations are required
Disable – When disabled, instrumentation must be performed manually. Click here for more information
Note: Refrain from using auto-instrumentation with WebSphere. Opt for manual instrumentation. Click here for more information
Select Vulnerabilities
Select the vulnerabilities against which VSP-Web (on Web Server) Protection is desired. The protection level can be configured for each vulnerability. By default, when a vulnerability is selected, the associated protection mode is set to Detect
Note: XML Injection protection includes DTD Injection, also called XML External Entity (XXE) Injection. XXE attacks manipulate the DTD, allowing an attacker to view files or access other network resources to which the server has access. To detect XXE injection, the following vulnerabilities must be enabled - Path Traversal Injection, Remote File Inclusion and Local File Injection
LFI Profile Name
(Optional) Drop-down list with all available LFI Profiles
RFI Profile Name
(Optional) Drop-down list with all available RFI Profiles
Click SAVE to view the newly added Application
More Services and Processes can be added to the same Application
To add instances to the Applications, navigate to the Services tab and click Associate Instances
Select all the required Application Instances on the pop-up window. Click Associate
Navigate to Manage > Web > Application Provisioning in the left navigation pane. Click Add Application
Provide Application (Name) and Version (Optional). Click NEXT
Add Application Server
Provide Service Name, Service Tag, Service Type and Operating System Platform
Provide Service Type as Application Server for Web and Memory Protection
The provided service tag can be utilized during VSP probe installation to enable automatic provisioning into the Application Server
Select the appropriate Deployment Type – Container Or K8s
Provide the Pod Name (found in the application’s K8s yaml file) as the Deployment Name
NOTE
Ensure that the Deployment Name provided here is the same name as in the customer yaml file during execution of the script vsp_vdt_ci.sh in CI Phase
.png)
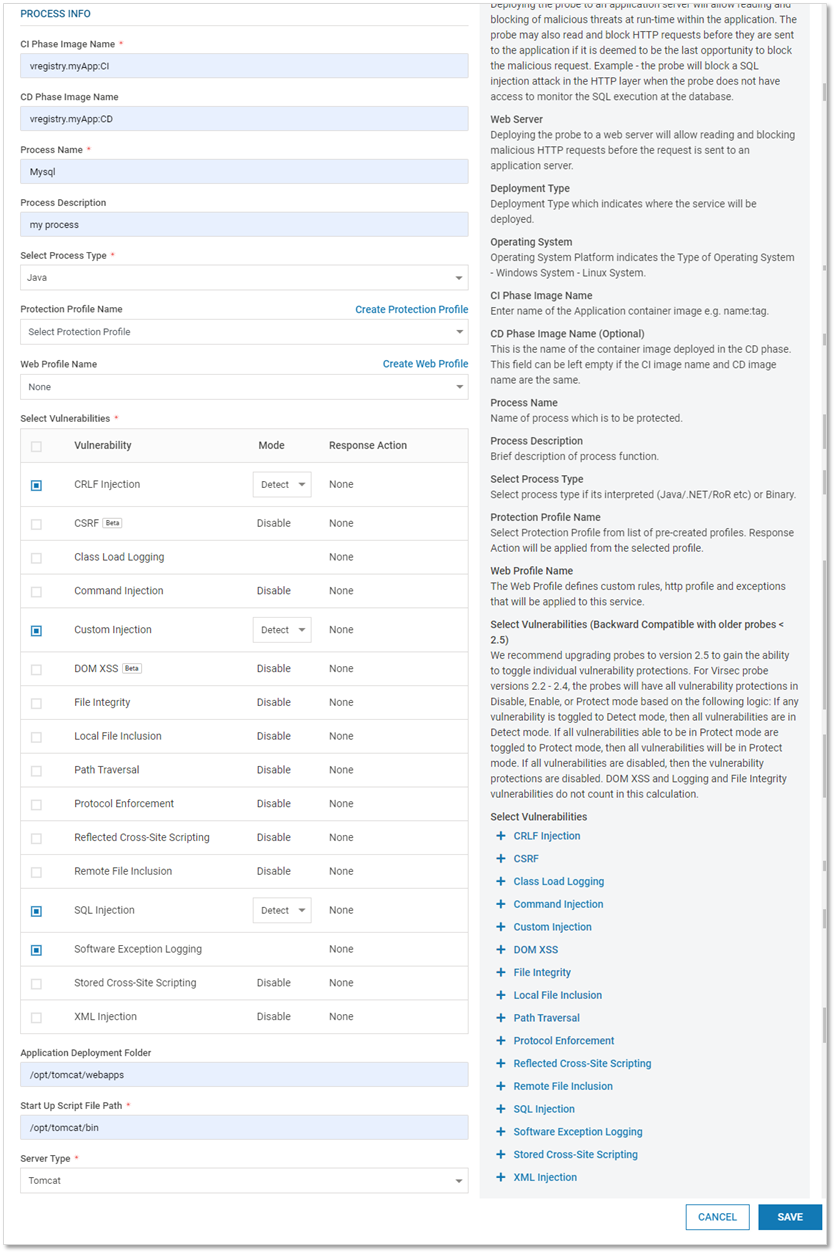
Add Process: Provide the below information
Field Name
Description
CI Phase Image Name
Name of the Container Image deployed in CI Phase
CD Phase Image Name
(Optional) Name of the Container Image deployed in CD Phase
Process Name
Name of the Process
Process Description
(Optional) A short description of the process
Select Process Type
Select the appropriate process type from the drop-down. Eg: Java, Binary
Protection Profile Name
Select the appropriate Protection Profile from the drop-down. A link to create a new Protection Profile is also provided on the CMS
Web Profile Name
(Optional - For VSP-Web only) Drop-down list with all available Web Profiles
Select Vulnerabilities
Based on the selected Process Type, select the vulnerabilities against which VSP Protection is desired. The protection level can be configured for each vulnerability. By default, when a vulnerability is selected, the associated protection mode is set to Detect
Note: XML Injection protection includes DTD Injection, also called XML External Entity (XXE) Injection. XXE attacks manipulate the DTD, allowing an attacker to view files or access other network resources to which the server has access. To detect XXE injection, the following vulnerabilities must be enabled - Path Traversal Injection, Remote File Inclusion and Local File Injection
Application Deployment Folder
(For FSM only) Location where the application is deployed. Eg: /opt/tomcat/webapps
File Integrity Exclusion Folders
(For FSM only) List of directories to be excluded from FSM separated by comma. Eg: /opt/tomcat/logs,/opt/tomcat/work
File Integrity Monitored Folders
(For FSM only) List of additional directories to be included for FSM monitoring. Eg: /usr
File Extension Exclusion List
List of file extensions to be excluded from FSM Monitoring. Eg: *.log
Versions 2.9 and Below:
Start Up Script File PathFull path (with the executable name) of the Web Server/Application Server start up script. Eg: /usr/local/apache2/bin/run_apache.sh
Versions 2.10 and Above:
Start Up Script File Path or Service NameFull path (with the executable name) of the Web Server/Application Server start up script. Eg: /usr/local/apache2/bin/run_apache.sh
ORThe service name of the application server if it is configured as Window/Linux service
Server Type
(For VSP-Web only) Select the Server Type from the drop-down. Eg: JBoss, Weblogic, Tomcat
LFI Profile Name
(Optional) Drop-down list with all available LFI Profiles
RFI Profile Name
(Optional) Drop-down list with all available RFI Profiles
Add Web Process: Provide the below information
Field Name
Description
Service Name
Name of the Service
Service Tag
Service Identifier that helps users to locate the appropriate web service
Server Type
Select Web Services
Deployment Type
Select the appropriate type – Virtual Machine, Container, K8s (Kubernetes Pod)
Operating System
Select the appropriate Operating System – Windows OR Linux
Deployment Name
Name of the associated deployment
CI Phase Image Name
Name of the Container Image deployed in CI Phase
CD Phase Image Name
(Optional) Name of the Container Image deployed in CD Phase
Web Server Name
Name of the Web Server
Web Server Description
(Optional) A short description of the Web Server
Web Server Type
Select the Web Server type from the drop-down
Web Server Command Line
The exact command line for starting the web server
Protection Profile Name
Select the appropriate Protection Profile from the drop-down. A link to create a new Protection Profile is also provided
Host Name
Provide the <hostname>:<port> values. If multiple applications are deployed on the same Web Server, provide the values for all the hostnames and ports, separated by comma
Web Profile Name
Provide the <hostname>:<port> values. If multiple applications are deployed on the same Web Server, provide the values for all the hostnames and ports, separated by commas
Select Vulnerabilities
Select the vulnerabilities against which VSP-Web (on Web Server) Protection is desired. The protection level can be configured for each vulnerability. By default, when a vulnerability is selected, the associated protection mode is set to Detect
Note: XML Injection protection includes DTD Injection, also called XML External Entity (XXE) Injection. XXE attacks manipulate the DTD, allowing an attacker to view files or access other network resources to which the server has access. To detect XXE injection, the following vulnerabilities must be enabled - Path Traversal Injection, Remote File Inclusion and Local File Injection
LFI Profile Name
(Optional) Drop-down list with all available LFI Profiles
RFI Profile Name
(Optional) Drop-down list with all available RFI Profiles
Click SAVE to view the newly added Application
More Services and Processes can be added to the same Application
Application Auto-Discovery (VM Only)
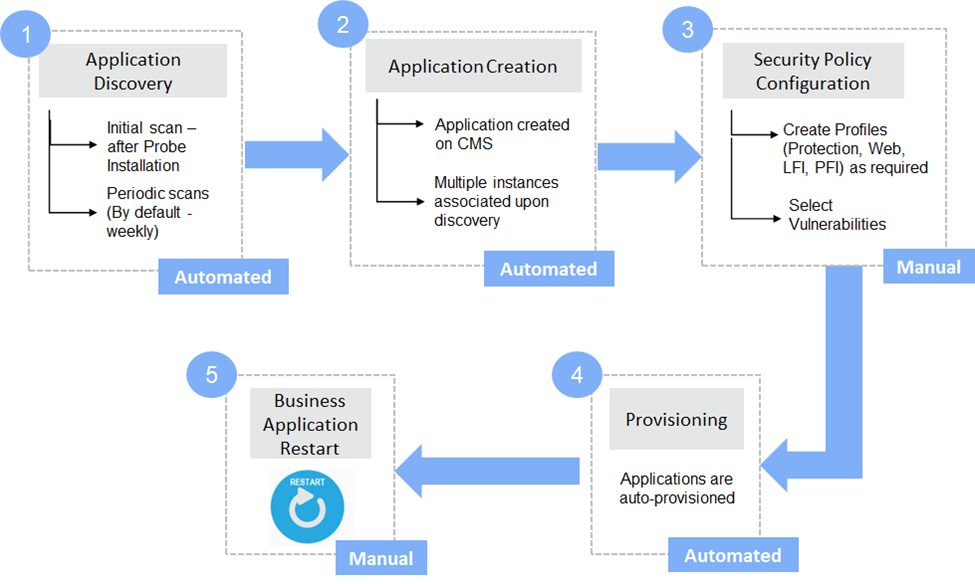
Application Discovery is a component of the installed VSP probe. It scans the Probes after installation and at regular intervals (Default duration - weekly) to discover the web applications hosted on them. Once the web applications are discovered, appropriate Applications are created on CMS with the discovered information. In cases where manual application creation is desired, refer to Create Application
Coverage
Version 2.11 and Above: Application Discovery discovers all applications. In cases where the applications are not compatible with VSP, it is indicated on CMS as depicted:

Version 2.10 and Below: Application Discovery discovers applications on both Linux and Windows VMs that can be provisioned as per the VSP Compatibility Matrix
For Java-based applications:
Cluster/Domain mode is not supported for application servers listed below:’
JBoss
WildFly
Glassfish
WebLogic
WebSphere
NOTE
Refrain from using auto-instrumentation with WebSphere. Opt for manual instrumentation
Java Application servers configured as services may not be discovered
Pre-requisites
The pre-requisites are:
(Not applicable for .NET and .NET Core) The application process is running during Application Discovery scan
Application Discovery Workflow
After probe installation, Application Discovery collects information about running applications on the host
Based on this information, a new application is created or the instance is associated with the existing application on CMS. A system alert is generated for auto-association of instances
Navigate to Manage > Web > Application Provisioning in the left navigation pane to view the application
The name of the newly created Application is of the format: <Process Type>_<Deployment Folder>_<Application Server>_<Application Server Version>
Example: JAVA17_opt_my_app_Tomcat_10.0
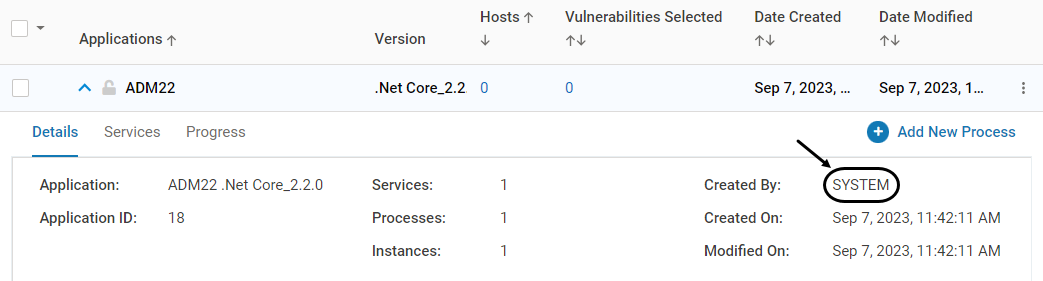
For .NET and .NET Core Applications, the name of the newly created Application is of the format: <SiteName_SubSiteName1_…_SubsiteNameN_OnIIS>. The .NET version number is also populated on the UI
NOTE
The slashes (“/” OR “\”) in the directory paths are replaced with an underscore (“_”)
The maximum number of characters for the application name is 55. In cases where the number is exceeded, it is truncatedThe auto-discovered applications have the Created By field as System
During upgrade scenarios from VSP 2.5/2.6 to VSP 2.7 or above, review both the discovered applications from VSP 2.7 or above and user-created applications from VSP 2.5/2.6 after Application Discovery. Delete the applications that are not needed
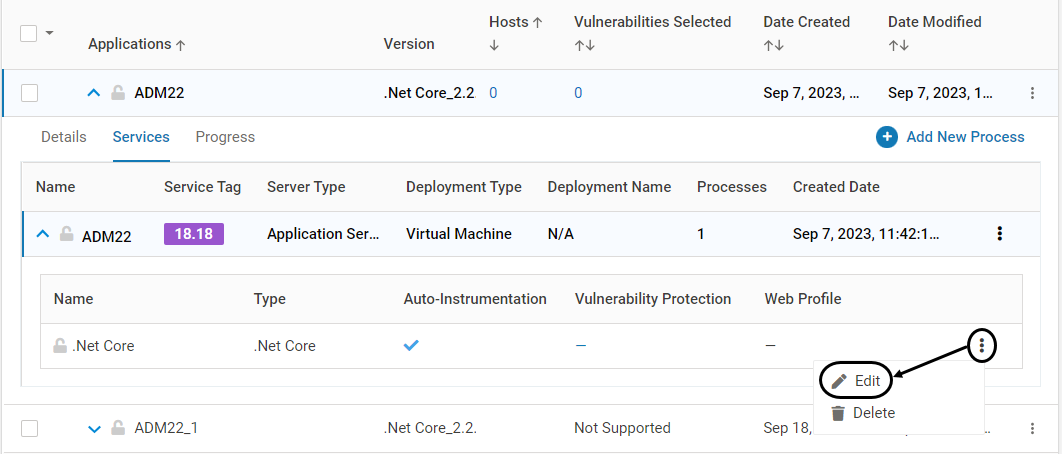
Once the application is created, the user may configure the security policy by editing the newly created process:
Create the required protection profile, web profile, LFI/RFI profiles. Associate them with the application
Select vulnerabilities
The auto-discovered fields – Process Type, Application Deployment Folder, Start Up Script File Path, Server Type - cannot be modified since they are auto-discovered. Other fields including the names of Application, Service and Processes can be modified
NOTE
In cases where the security profile is not configured and the process is not running on the instance, another Application Discovery scan removes the newly created application
For WebSphere, the auto instrumentation option is disabled by default
Once the security profile is configured, the application is auto-provisioned and moves to 100% completion
Restart the business application (application process) to enable security policies in the application. This restart is required only during the first-time selection of security policies. Subsequent changes to the security policies do not require an application restart
Application Discovery Configuration
Below are the commands for various application discovery configurations
To modify the duration between the automated Application Discovery scans
vsp-cli edit-service fde edit restartFrequency <Number of hours>To disable application discovery scans
vsp-cli edit-service fde edit restartFrequency 0To manually initiate a scan
vsp-cli start fde
Upgrades to PHP and NodeJS Language Version
VSP Auto Discovery creates a new application in CMS if the application changes PHP or NodeJS versions (Example: PHP is upgraded from version 7.3 to version 7.4). The new application is listed in CMS alongside the old application with the older PHP or NodeJS version. Security policies need to be recreated for this new application on the “Edit Process” screen.
NOTE
In case of NodeJS, any modification of the start-up script path results in a new application creation in CMS by VSP Auto Discovery
Application List on CMS
The list of Applications can be viewed on the CMS
Navigate to Manage > Web > Application Provisioning in the left navigation pane. Applications are listed along with the number of attacks, threats and incidents associated with them
Standard search and export/import features are available
Expand an Application to view more information in the tabs:
Details – Generic information about an Application is provided
Services– Information related to the associated Services and their Processes is provided
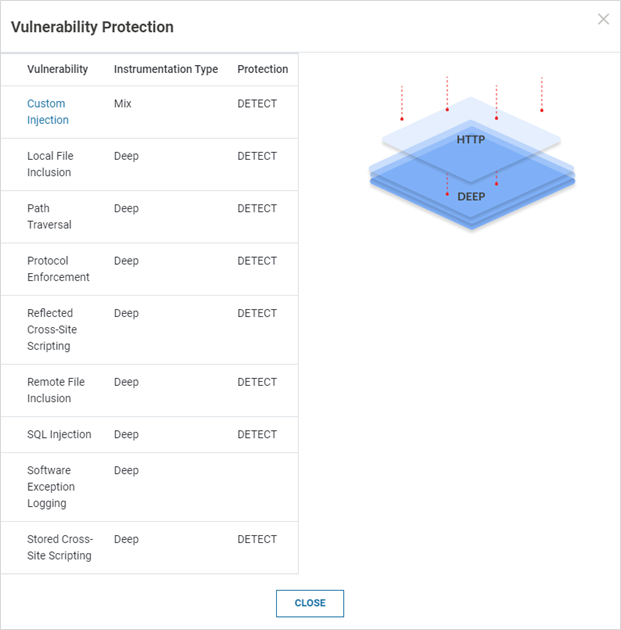
To view the configured vulnerabilities protection, expand the required service and click Vulnerability Protection
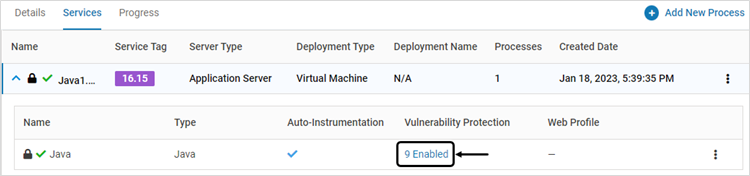
The pop-up window displays Instrumentation Type and Protection Mode for each configured vulnerability. The instrumentation types are Deep (for application services), HTTP (for Web services) and Mix (for Custom Injection – both Deep and HTTP)
Progress – Information related to the associated instances, status, configured vulnerabilities and the completion (in percentage) is provided. In case of an error(s), the information about the error is displayed
Version 2.10 and Below: Click the Attack, Threat OR Incident link to navigate to the Incidents page that displays the incidents associated with the Application

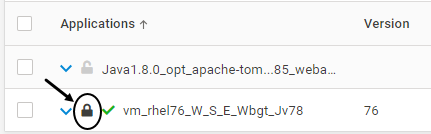
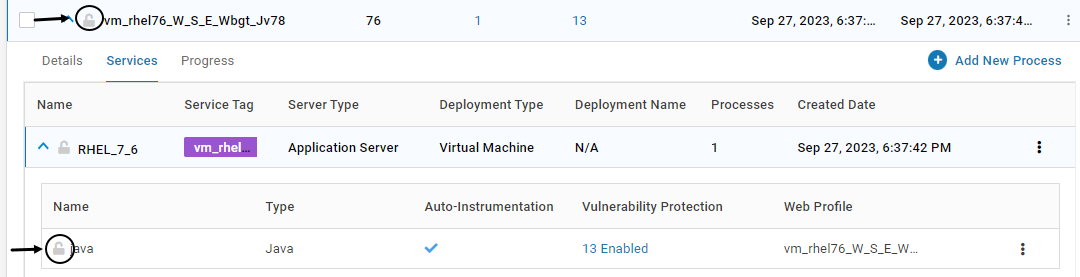
For Applications with Containers or Kubernetes Pod instances, once the Installation of VSP Agent is completed on that instance, the configuration is locked. This is depicted by the below icon. Once the configuration is locked, it cannot be deleted. Modification is allowed only for certain fields
Lock/Unlock Processes (Containers only)
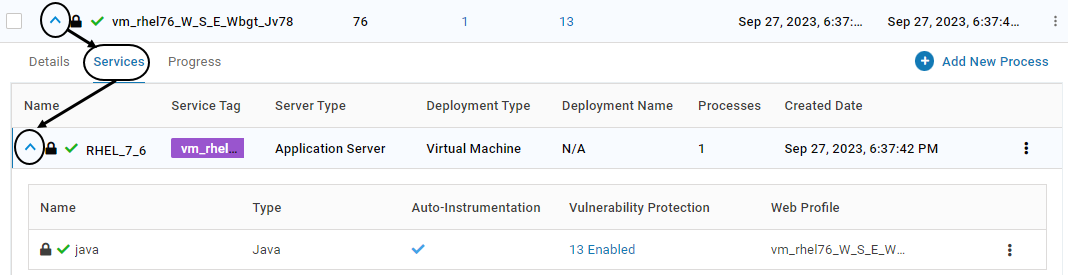
Once the CD tool (Click here for more information) is executed during Application Setup, the process associated with an application is locked. It is indicated by the below icon
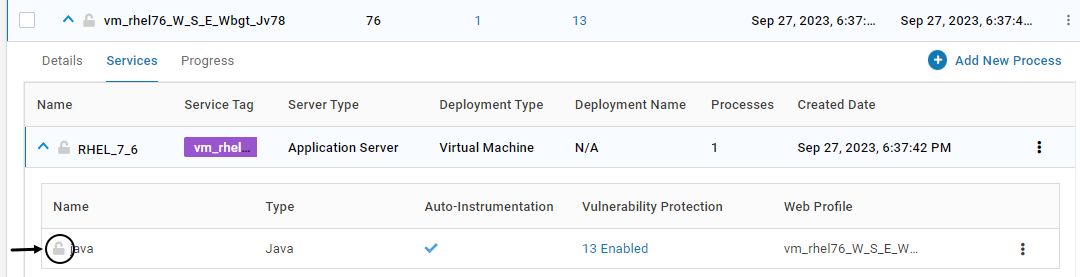
To unlock the process, expand the application and click on tab Services. Expand the listed service
Click on the below icon associated with the process. Click YES on the confirmation screen
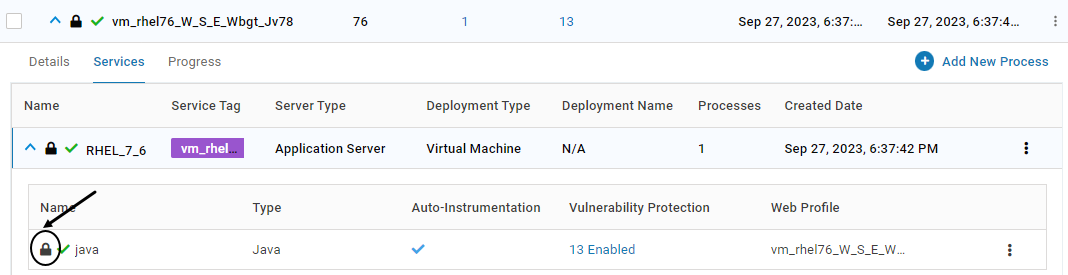
Once unlocked, it is indicated by the below icon
To lock an unlocked process, click on the below icon. Click YES on the confirmation screen
Secure Probe
Securing/Provisioning an Probe begins VSP protection on that instance. Auto-provisioning can be enabled by providing the service tag at the time of Probe Installation. It can be performed manually:
Click Start to secure a specific Probe. VSP monitoring begins at that instance. This is applicable for VMs only

Click YES on the confirmation pop-up
For Pods and Containers, the provisioning is initially automated. Subsequent stop and start actions are allowed
The progress of securing each server is displayed through a progress bar. The information on the page gets refreshed automatically

Click Stop to stop provisioning of a specific Probe. This is applicable for VMs only.

Click YES on the confirmation pop-up
NOTE
Once an Application is provisioned, VSP may report File events as a file integrity check is carried out with VirusTotal during Provisioning
Click here for more information about Custom Provisioning for VM
Export/Import Applications
Export and import of applications can be used:
When VSP protection is extended to a different environment (Example: Pre-production to Production environment) OR
To clone an existing entry
The Applications can be imported/exported with .virsec extension
The exported information consists of the associated services, processes, protection profile and web profile
Ensure that import/export operations are carried out in the same VSP version. Import/export feature is compatible across various patches in the same major release (Example: VSP 2.8.x)
Modify Application
NOTE
For Applications already secure and running with VSP Monitoring, ONLY additional eligible Probes can be included
To edit any other parameter in an application, ensure that it is stopped first
For containers, only the Applications with unlocked processes can be modified
To modify applications, follow the below steps:
Navigate to Manage > Web > Application Provisioning in the left navigation pane
To modify the fields Application Name or Version, click Edit. Modify the fields as required

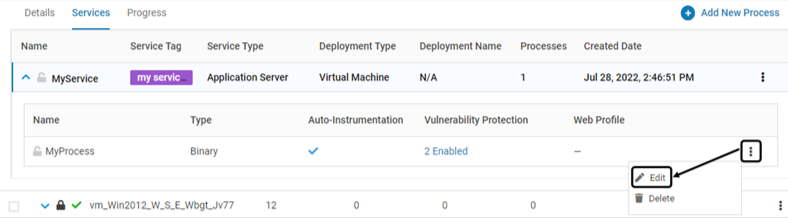
To modify an existing Service, click Edit associated with it. Modify as required
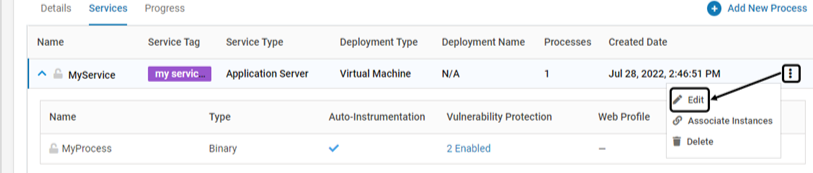
To modify an existing Process, click Edit associated with it. Modify as required
Delete Associated Instances (VMs only)
Navigate to Manage > Web > Application Provisioning in the left navigation pane. Expand the secured application
Navigate to the Progress tab. Click Delete

Click YES on the confirmation pop-up
Delete Application
NOTE
Applications already secure and running with VSP Monitoring cannot be deleted
To delete such applications, it is necessary to stop the provisioning
To delete applications, follow the below steps:
Navigate to Manage > Web > Application Provisioning in the left navigation pane
On the displayed list of applications, click the delete link of the required application

Click YES on the confirmation pop-up