The Install Probe, Upgrade Probe, Uninstall Probe, Install Script and vsp-cli command APIs are available only for Version 2.11 and Above.
Centralized Probe Management (CPM) API aims to simplify the upgrade and troubleshooting requirements scenarios on Probes, deployed on different application platforms. Without this API, it becomes necessary to log in to the host for upgrade/ troubleshooting. It can be installed using any one of the below methods.
Method 1: Script-based Installation
Install CPM using the below process:
- Download the below files from LFR
- CPM installable – vsp_install_cpm.sh (Linux) OR vsp_install_cpm.bat (Windows)
- Required Certificates - certificates.zip
- Based on the deployment type, utilize the below commands to install CPM:
- CMS SaaS Instance:
- In this scenario, the domain name can be resolved by DNS automatically and host entry is not required as a parameter
- There are a few parameters that generally suffice for most of the scenariosShell
----Linux
./vsp_install_vm.sh -C <CMS_DOMAIN> -H 0 -T <certs tar path>
----Windows
./vsp_install_vm.bat -C <CMS_DOMAIN> -H 0 -T <certs zip path>
- CMS SaaS Instance with Proxy Server:
- In this scenario, the domain name can be resolved by DNS automatically, it is present behind the proxy server. So, the proxy server IP address must be added as an entry in the hosts file
- There are a few parameters that generally suffice for most of the scenariosNOTEIn the below command, If the customer adds the entry in the DNS server, the parameter "-H" can be ignored
----Linux
./vsp_install_vm.sh -C <CMS_DOMAIN> -c <CMS_IP> -k <IP1,IP2,IP3> -K <KAFKA_DOMAIN_1, KAFKA_DOMAIN_2, KAFKA_DOMAIN_3> -H 1 -T <certs tar path>
----Windows
./vsp_install_vm.bat -C <CMS_DOMAIN> -c <CMS_IP> -k <IP1,IP2,IP3> -K <KAFKA_DOMAIN_1, KAFKA_DOMAIN_2, KAFKA_DOMAIN_3> -H 1 -T <certs zip path>
- On-prem CMS:
- In this scenario, CMS is deployed in the customer environment. We need to add the IP address in hosts file or the DNS server
- In scenarios where the hosts entry must be added, the below command can be utilized for most of the cases:Shell
./vsp_install_vm.sh -C <CMS_DOMAIN> -c <CMS_IP> -k <KAFKA_IP> -K <KAFKA_DOMAIN_1> -H 1 -T <certs tar path> - In scenarios where the customer adds the entry in the DNS server, the below command can be utilized for most of the cases:
./vsp_install_vm.sh -C <CMS_DOMAIN> -c <CMS_IP> -k <KAFKA_IP> -K <KAFKA_DOMAIN_1> -H 0 -T <certs tar path>
- CMS SaaS Instance:
- The table below describes the various parameters accepted by the scripts:
| Parameter | Description |
|---|---|
Required Parameters | |
| -c <CMS_IP> | [On-prem instances] IP Address of CMS |
| -C <CMS DNS Name> | [SaaS instances] Custom DNS name for CMS. Default value is int.cms.virsec.com |
| -H <0|1> | [SaaS instances] Entries are not added in the /etc/host file to resolve the LFR and CMS DNS names. Allowed values are 0 (Do not add), 1 (Default - add). If value "1" is used, ensure that the parameters -C and -K are provided |
| -T <Certificates File Path> | [On-prem and SaaS instances] Location of the tar/zip file containing the client certificates. This is not required when the parameter -U is used |
Optional Parameters | |
| -B <OS_Bit> | Host OS Bit. Allowed values are 32, 64 |
| -f <0|1> | To force CPM uninstall during upgrade without file backup. Allowed values are 0 (Do not force, Default value) and 1 (Force Upgrade without file backup) |
| -i <Host_IP> | IP Address of Probe (Host) |
| -k <VSP_Kafka_Node_IP> | IP Address of Kafka. This parameter is required if CMS IP and Kafka IP are different |
| -K <Kafka DNS Name> | Custom DNS name for Kafka. Default value is vsp-kafka.virsec |
| -l <lfr_ip> | IP Address of CMS |
| -L <LFR_Port> | VSP LFR Port. Default Port is 8443. This is not applicable in case of SaaS CMS |
| -n <Hostname> | Hostname of the Probe |
| -o <Host_OS> | To specify the Operating System. Allowed values are: rhel, ubuntu, debian_stretch, debian_buster, amazonlinux This parameter must be used along with "-V" For Oracle Linux 8, provide the value rhel for parameter “-o” |
| -r <0 | 1> | To restart VSP CPM services after installation. Allowed values are 0 (Default - Do not start VSP services), 1 (start VSP services) |
| -u <0 | 1> | To uninstall existing CPM services and install the latest available version. Allowed values are 0 (Default - Do not uninstall), 1 (uninstall) |
| -U <0 | 1> | To uninstall existing CPM services. Allowed values are 0 (Default - Do not uninstall), 1 (uninstall) |
| -v <vsetting> | To print Verbose information. Allowed values are 0 (INFO level), 1 (DEBUG level) and 2 (TRACE level) |
| -V <Host OS Version> | To specify the version of the Operating System. This parameter must be used along with "-o" For Oracle Linux 8, provide the value 8 for the parameter “-V” |
Method 2: MSI-based Quiet Installation (Windows)
Pre-requisites
- Ensure that the below packages are installed. They are included as part of the downloaded .zip file:
- VC_redist.x86.exe
- VC_redist.x64.exe (Not applicable for Windows Server 2003 32 Bit Machines)
- For Windows 2008, the Patch: Security Update for Microsoft Windows (KB4474419) is installed. Use the link below to install the required patch: https://www.catalog.update.microsoft.com/search.aspx?q=kb4474419
- To install the VC_redist packages, using the below steps:
- Open Command Prompt (Run as an Administrator) and navigate to the directory with the file vsp.msi
- For installation of VC_redist.x64.exe, execute the below command:Shell
start /wait VC_redist.x64.exe /q /norestart /l*v logs.txt - For installation of VC_redist.x86.exe, execute the below command: (Not applicable for Windows Server 2003 32 Bit Machines):Shell
start /wait VC_redist.x86.exe /q /norestart /l*v logs.txt
Installation
CPM installation is performed using the quiet installation method using MSI for Windows. Utilize the below parameters as required:
| Parameter | Description |
|---|---|
| START_CPM_SERVICE | To start/stop CPM services after Installation. Allowed Values are: 1 (Start; Default) and 0 (Stop) |
Command for CPM Installation - On-Prem:
start /wait msiexec /i VSPCPM.msi /qn /norestart CMS_IP=<CMS_IP> CERTS_ZIP=<Certificate_File_Path> ACCEPTEULA=1 /l*v c:\vspcpm_installermsi.logCommand for CPM Installation - SaaS:
start /wait msiexec /i VSPCPM.msi /qn /norestart CMS_DNS_NAME=<CMS_DNS_NAME> NO_HOST_ENTRY=0 CERTS_ZIP=<Certificate_File_Path> ACCEPTEULA=1 /l*v c:\vspcpm_installermsi.logCommand for CPM Uninstallation:
start /wait msiexec /x {38276D79-4FD0-40B8-A120-0C49D5591A3C} /quiet /qn /norestart /l*v c:\vspcpm_installermsi.logMethod 3: Using GPO (Windows)
Using GPO (Group Policy Object), CPM can be installed on the below Windows Operating Systems:
- Windows 2016
- Windows 2019
- Windows 2022
Pre-requisites:
- Access to the Domain machine
- Copy the CPM installable and certificates (certificates.zip) on a common drive
Follow the below steps for CPM installation:
- In the Domain machine, access the Group Policy Management Editor
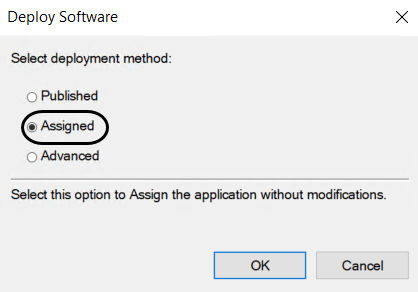
- Create a new policy for CPM installation with the deployment method as Assigned
- The below parameters can be modified using Orca
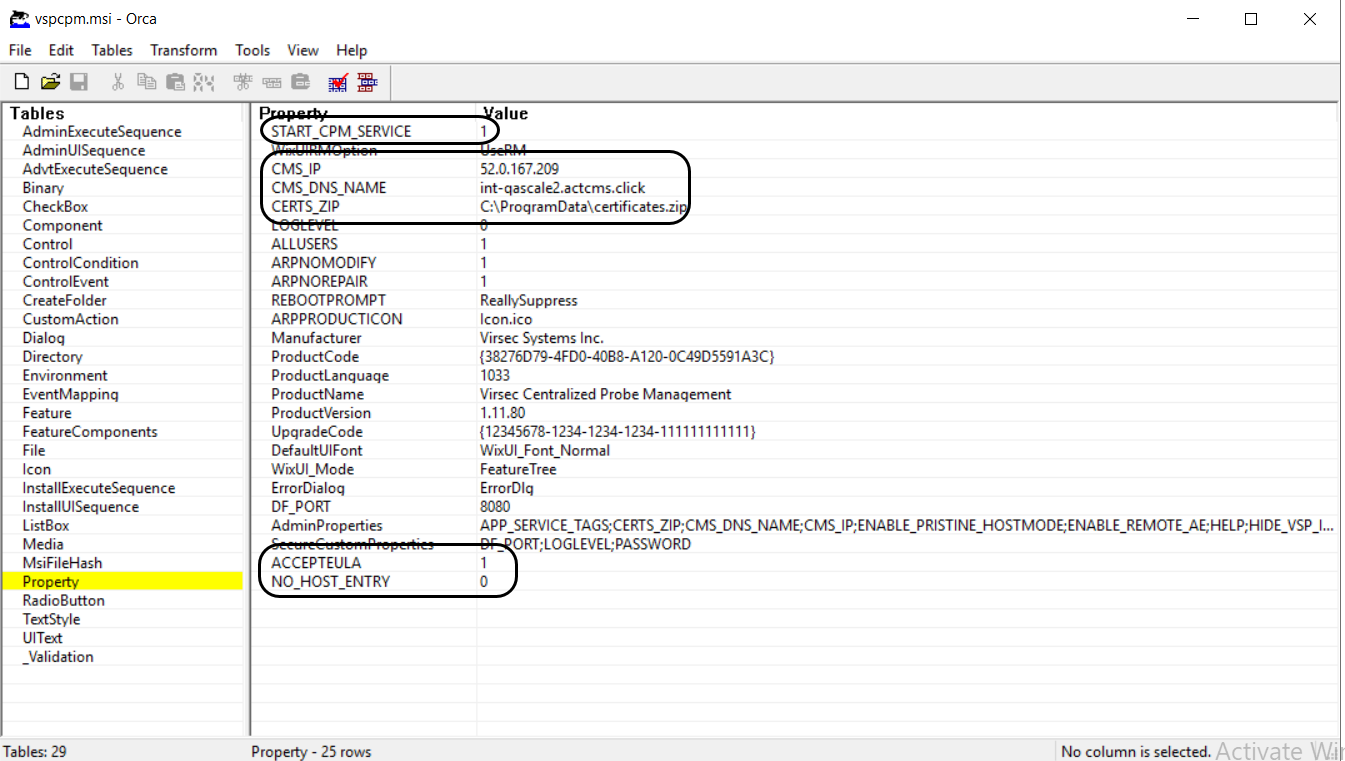
Parameter Description START_CPM_SERVICE To start/stop CPM services after Installation. Allowed Values are: 1 (Start; Default) and 0 (Stop) CMS_IP IP Address for CMS CMS_DNS_NAME DNS Name for CMS CERTS_ZIP Complete location of the certifications zip file (along with the file name) on the Probe machines. Example: C:\ProgramData\certificates.zip ACCEPTEULA Defines acceptance to the license agreement. Expected value: 1 NO_HOST_ENTRY Entries are not added in the file /etc/host to resolve the LFR and CMS DNS names. If this parameter is used, ensure that the parameters -C and -K are provided
Default value is 0
Expected values are 0 (Entries added, On-Prem) or 1 (Not added, SaaS)
- Select the CPM package/MSI file (copied on common drive). For MSI-based installation, ensure that the Pre-requisite steps are complete
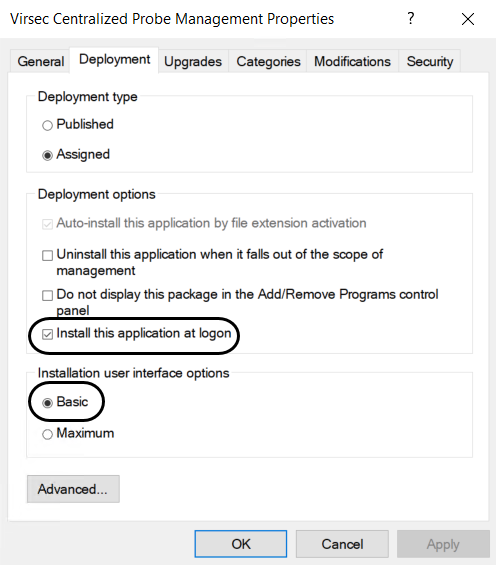
- Double-click on the created policy. Navigate to the tab Deployment
- Enable the option Install Application at logon
- Select Installation user interface options as Basic
- Click Apply and OK
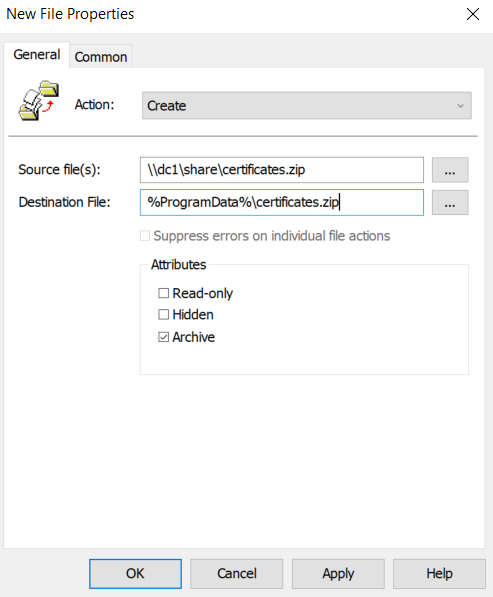
- Navigate to Preferences > Windows Settings> Files. Select the certificates.zip file so that it is copied to the specified directory on the Probe servers during Security Policy Update
Method 4: Easy Script-based Installation
Install CPM using the below process:
- Navigate to File Repository under Administration in the left navigation pane of CMS
- Download the CPM installable install_cpm.sh (Linux) OR CPM_Installer.bat (Windows)
- Execute the below commands with root (Linux) OR admin(Windows) to install CPM
- Linux:
chmod 755 install_cpm.sh ./install_cpm.sh - Windows: Execute the script CPM_Installer.bat at Command Prompt as an Administrator
- Any available deployment automation tool can be utilized for installation. A few examples are Ansible (Linux) and GPO (Windows)
- Linux:
Verification
Utilize the below commands to view the status of the CPM service.
- Linux:
sudo service vspcpm status - Windows:
sc query vspcpm
Data Directories
- The extracted API information is stored in the mounted CPMS data directory, that can be accessed at /home/virsec/cpmdata
- Files are automatically purged after a configured duration. By default, this duration is 7 days