License Configuration
- 08 Sep 2023
- 3 Minutes to read
-
Print
-
DarkLight
-
PDF
License Configuration
- Updated on 08 Sep 2023
- 3 Minutes to read
-
Print
-
DarkLight
-
PDF
Article summary
Did you find this summary helpful?
Thank you for your feedback!
About this Article
This article provides information regarding adding licenses to the license server, viewing license details and revoking license.
VSP Licenses can be procured from an On-premise or a Cloud License server. The information related to the procured licenses can be viewed in CMS. VSP uses the Flexera licensing tool to issue the required number of licenses.
On-premise License server can be used when internet connection is not available for CMS - Cloud License server can be used when CMS has internet connectivity and can able to access Flexera Cloud license server
How many licenses to acquire?
- Virtual Machines - Each Probe instance requires one license
- Containers - Ten containers can be secured using one license
Once a license is issued to an account holder, an Activation ID is sent to the registered email ID along with the information about the number of instances that can be activated using that ID.
On-Premise License Server
The on-premise license server is available as a pod.
- Execute the below commands for Container only to get the On-premise license server up and running
cd serviceperpod/infra kubectl apply -f vsp_licenseserver.yaml -n virsec - Log in to the worker node for containers OR the CMS VM for VMs and execute the below command to verify that the server is ready and running
docker ps | grep license docker exec -it <container_ID> bash cd /usr/bin/flexnetls-x64_linux-2022.12.0/enterprise ./flexnetlsadmin.sh -server http://localhost:7070/api/1.0/instances/~ -status - Execute the below commands to add a license
- Create a capability request bin file using the below command and copy the file to the local system
./flexnetlsadmin.sh -server http://localhost:7070/api/1.0/instances/~ -activate -id <activation ID> -count <Number of licenses> -o caprequest.bin - Log in to the Flexera portal URL - https://flex1298.flexnetoperations.com/flexnet/operationsportal using Activation ID or Virsec-provided user credentials
- Navigate to Devices > Offline Device Management
- Select Generate License and choose capability request bin file from the local directory. Click Upload
- Execute the below commands to load the license
docker cp capabilityResponse.bin <container_ID>:usr/bin/flexnetls-x64_linux-2022.12.0/enterprise docker exec -it <container_ID> bash cd /usr/bin/flexnetls-x64_linux-2022.12.0/enterprise ./flexnetlsadmin.sh -server http://localhost:7070/api/1.0/instances/~ -activate -load capabilityResponse.bin - Execute the below command to list the number of licenses
./flexnetlsadmin.sh -server http://localhost:7070/api/1.0/instances/~ -features
- Create a capability request bin file using the below command and copy the file to the local system
- Once the licenses are loaded, they are listed in CMS under Administration > Licenses
Persistence of Licenses
Whenever there is a restart of CMS, license server or CMS VM, the persistence behavior for licenses varies in VMs and Containers:
- VMs: The licenses maintain persistence except in case of a VM crash with a file system wipeout
- Containers: The licenses lose persistence
- In cases where the licenses lose their persistence, generate a capability request to load the licenses
Cloud License Server
- Log in to the Flexera portal URL - https://flex1298.flexnetoperations.com/flexnet/operationsportal using Activation ID or Virsec-provided user credentials. All the products and the respective activation IDs will be listed
- To create a Cloud server, navigate to Devices > Create Device. Provide the required information as described below and click Save
- Name
- Check the checkbox to indicate “Runs License Server”
- Choose the deployment type as Cloud
- Select the appropriate Account from the drop-down list
- Site Name (Optional).
- The newly created device is listed under Devices > Devices
- Click on the newly created device to view the device information. Note down the License Server ID
- To add licenses to the server, navigate to Action > Map Entitlements in the displayed device information
- Add the number of licenses to be added from the list and click Save
- The selected licenses with the desired quantity is added to the device and listed with Status as License generated
- Follow the below steps to enable Cloud License Manager in CMS
- Navigate to Configurations under Administration in the left navigation pane of CMS
- Expand License Manager and click Enable
- Update the Cloud License Server URL as https://flex1298.compliance.flexnetoperations.com/instances/<LicenseServerID>
/request. Click SAVE
- Once the licenses are loaded, they are listed in CMS under Administration > Licenses
View License Information
- Navigate to Administration > Licenses in the left navigation pane in CMS
- Once an application is secured, the number of licenses required by the application is automatically used. This information is displayed on the licenses page in CMS
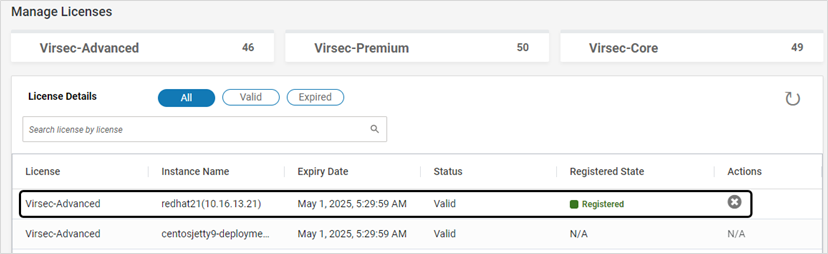
- When an application is stopped in the Applications Provisioning page, the used licenses are freed automatically
- Once a license expires or its count is reduced on the license server, the displayed license type may change since (only) the required license type is listed and NOT the previously active license
Revoke License
- Navigate to Administration > Licenses in the left navigation pane in CMS
- All licenses including used licenses are displayed
- For any Probe in Unknown status for more than two days, license can be revoked using the button shown below:

Was this article helpful?